はじめに
こんにちは、Riiid R.inside バックエンドエンジニアのマ・ジュファンです。最近、新しいB2Bプロジェクトを進めることになり、プロジェクト群を再構成する機会ができたことで Spring Security OAuth2 Authorization Server ライブラリを使うようになりました。この過程での私の経験や考えが少しでも役に立てば、あるいは認証サーバーに関心のある方々のためになればと思い、本記事を書くことにしました。
Spring Security カスタマイジング実装の背景
Spring バージョンアップデートの苦労
Spring boot 3.x バージョンがリリースされた後も、依然として実務では Spring 2.x バージョンが主流です。やはりバージョンアップデートは実務者の立場からするとかなり厄介なことで、主に以下の理由でアップデートを避けています。
しかし私は新しいプロジェクトを前にして、Spring boot 2.x のサポート期限があまり残っていないこともあり、惰性に引かれて 2 バージョンで開発することになれば、結局は技術的負債を増やすだけではないかと思い、新しいプロジェクトは kotlin 1.8.21 + spring boot 3.1.2 + JVM 17で進めることにしました。
Riiid の B2B プロジェクトでは、ユーザー認証のために Spring security を利用して Authorization server を別途運用しています。Authorization server は OAuth2 プロトコルをベースに製品の状況に合わせてカスタマイズして使用しており、Front-end server、Authorization server、Resource Server がすべて同じシステムで構成されているため、ROPC(Resource Owner Password Credentials) をベースに Authorities や Role などをカスタマイズして提供していました。新しいプロジェクトでもプロジェクト環境の構成が同じであるため、同じ方式で認証サーバーを提供しようとしましたが、以下のような問題が発生しました。
上記の問題を解決するために代案を探していたところ、Spring boot 3 の公開とほぼ同時期に GA 1.0 へ上がった Spring Security OAuth2 Authorization Server ライブラリを使ってみることにしました。公開されてから間もなく、リファレンスが非常に不足していましたが、GA + 活発なコミュニケーション + 継続的なアップデートとサポート + deprecated code 更新への意志が重なっていたため、進めてみることにしました。
しかしライブラリを適用するために依存性を追加し、公式ドキュメントを参考にして開発を始めた瞬間から問題が発生しました。GA になったライブラリが(Spring Security OAuth2 Authorization Server を依存関係に持つ Spring Boot Starter OAuth2 Authorization Server)OAuth2.1 プロトコルを基準に従っており、OAuth 2.1 では ROPC(+ implicit grant) がそもそも実装されていなかったのです。推奨されない仕様とはいえ、そもそも実装すら不可能だとは、と思ってあちこち検索してみると、Authentication code grant に変更しろ、一方的になくしたのは納得できない、などの意見があるのを見る限り、本当になくなったようでした。(こういうことがあるからバージョンアップグレードはさらに大変なのでは..)
Get マジュ’s stories in your inbox
しかし今回のプロジェクトは依然として ROPC プロトコルを実装する要件を持っており、認証プロトコルを変更する理由もなく、継続的に使用する必要があったため、Spring security の基本アーキテクチャの上に、私たちの製品に必要な仕様をすべてカスタマイズして実装することに決めました。
Spring Boot OAuth2 Authorization Server 実装
依存性の追加
まず、Spring boot OAuth2 Authorization Server を使用できるように依存性を追加します。
plugins {
    id("org.springframework.boot") version "3.1.2"
    id("io.spring.dependency-management") version "1.1.2"
    kotlin("jvm") version "1.8.21"
}
repositories {
    mavenCentral()
}
dependencies {
    implementation("org.springframework.boot:spring-boot-starter-web")
    implementation("org.springframework.boot:spring-boot-starter-actuator")
    implementation("org.springframework.boot:spring-boot-starter-data-jpa")
    /* .... */
    implementation("org.springframework.boot:spring-boot-starter-oauth2-authorization-server:3.1.2")
}
tasks {
    compileKotlin {
        kotlinOptions {
            freeCompilerArgs = listOf("-Xjsr305=strict", "-Xjvm-default=all-compatibility")
            jvmTarget = "17"
        }
        dependsOn(processResources)
    }
    compileTestKotlin {
        kotlinOptions {
            freeCompilerArgs = listOf("-Xjsr305=strict", "-Xjvm-default=all-compatibility")
            jvmTarget = "17"
        }
    }
    test {
        useJUnitPlatform()
    }
}
Spring Security の認証プロセス
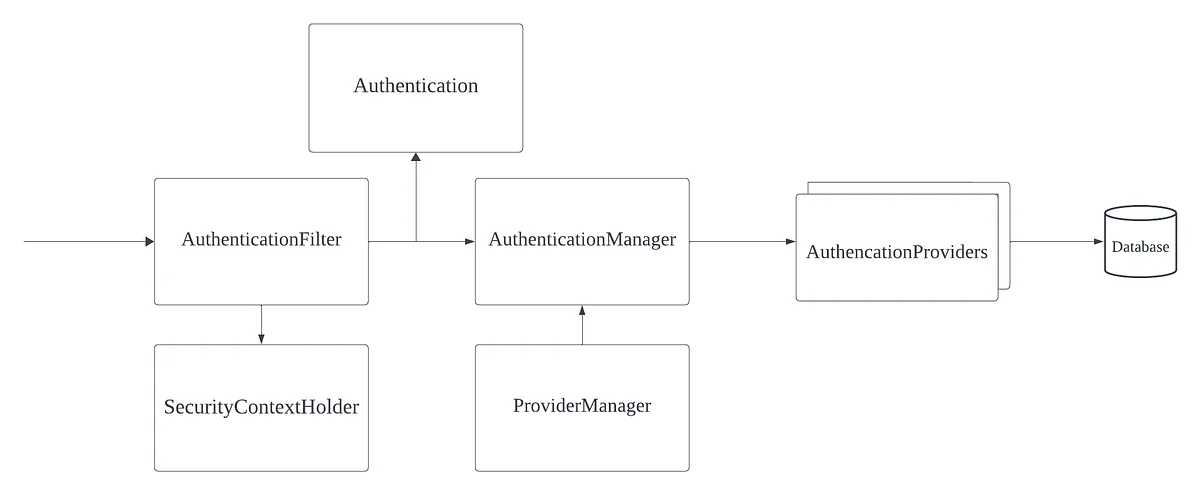
依存性を追加して本格的に開発する前に、基本的な Spring Security の流れについて知っておく必要があります。Spring Security の認証プロセスはやや複雑な流れを経ますが、(非常に)抽象化されたダイアグラムを見ると理解に大いに役立ちます。上のダイアグラムを順番に確認すると
認証プロセスを確認すると、認証プロセスをカスタマイズするためには Authentication、AuthenticationProvider を実装して認証プロセスに注入する必要があることが分かります。
Security Configuration設定
Spring Authorization server は公式 document で認証プロセスに実装体を設定する方法と例を提供しています。以下に公式 document の例があります。
@Bean
public SecurityFilterChain authorizationServerSecurityFilterChain(HttpSecurity http) throws Exception {
    OAuth2AuthorizationServerConfigurer authorizationServerConfigurer =
    new OAuth2AuthorizationServerConfigurer();
    http.apply(authorizationServerConfigurer);
    authorizationServerConfigurer
      .registeredClientRepository(registeredClientRepository)
      .authorizationService(authorizationService)
      .authorizationConsentService(authorizationConsentService)
      .authorizationServerSettings(authorizationServerSettings)
      .tokenGenerator(tokenGenerator)
      .clientAuthentication(clientAuthentication -> { })
      .authorizationEndpoint(authorizationEndpoint -> { })
      .deviceAuthorizationEndpoint(deviceAuthorizationEndpoint -> { })
      .deviceVerificationEndpoint(deviceVerificationEndpoint -> { })
      .tokenEndpoint(tokenEndpoint -> { })
      .tokenIntrospectionEndpoint(tokenIntrospectionEndpoint -> { })
      .tokenRevocationEndpoint(tokenRevocationEndpoint -> { })
      .authorizationServerMetadataEndpoint(authorizationServerMetadataEndpoint -> { })
      .oidc(oidc -> oidc
       .providerConfigurationEndpoint(providerConfigurationEndpoint -> { })
       .logoutEndpoint(logoutEndpoint -> { })
       .userInfoEndpoint(userInfoEndpoint -> { })
       .clientRegistrationEndpoint(clientRegistrationEndpoint -> { })
    );
   return http.build();
}
Configurer が builder pattern を用いて、基本的に認証プロセスをサポートするための多くの設定方法を提供しています。私たちは ROPC プロトコルを活用してトークン生成リクエスト、トークン検証リクエストをカスタマイズする必要があるため、上で 2 つ、tokenEndpoint と tokenIntrospectionEndpoint を設定する予定です。
tokenEndpoint
@Bean
public SecurityFilterChain authorizationServerSecurityFilterChain(HttpSecurity http) throws Exception {
 OAuth2AuthorizationServerConfigurer authorizationServerConfigurer =
  new OAuth2AuthorizationServerConfigurer();
 http.apply(authorizationServerConfigurer);

 authorizationServerConfigurer
  .tokenEndpoint(tokenEndpoint ->
   tokenEndpoint
    .accessTokenRequestConverter(accessTokenRequestConverter)
    .accessTokenRequestConverters(accessTokenRequestConvertersConsumer)
    .authenticationProvider(authenticationProvider)
    .authenticationProviders(authenticationProvidersConsumer)
    .accessTokenResponseHandler(accessTokenResponseHandler)
    .errorResponseHandler(errorResponseHandler)
  );

 return http.build();
}
tokenEndpoint の builder の例です。Converter、Provider、Handler などを登録できることが分かります。初期開発ではすべての handling を converter と provider で直接実行する予定であるため、Converter と Provider を実装して設定すればよいです。
tokenIntrospectionEndpoint
@Bean
public SecurityFilterChain authorizationServerSecurityFilterChain(HttpSecurity http) throws Exception {
 OAuth2AuthorizationServerConfigurer authorizationServerConfigurer =
  new OAuth2AuthorizationServerConfigurer();
 http.apply(authorizationServerConfigurer);

 authorizationServerConfigurer
  .tokenIntrospectionEndpoint(tokenIntrospectionEndpoint ->
   tokenIntrospectionEndpoint
    .introspectionRequestConverter(introspectionRequestConverter)
    .introspectionRequestConverters(introspectionRequestConvertersConsumer)
    .authenticationProvider(authenticationProvider)
    .authenticationProviders(authenticationProvidersConsumer)
    .introspectionResponseHandler(introspectionResponseHandler)
    .errorResponseHandler(errorResponseHandler)
  );

 return http.build();
}
tokenIntrospectionEndpoint は基本的に tokenEndpoint と似ているため、検証のための Converter、Provider を実装して設定すればよいです。公式 document の例は Java を基準に作成されており、私たちは kotlin を使用しているため、適切に変換してコードを作成しました。
Configuration
    @Bean
    fun authorizationServerSecurityFilterChain(
        http: HttpSecurity,
        authorizationService: OAuth2AuthorizationService,
        authorizationContentService: OAuth2AuthorizationConsentService,
        tokenGenerator: OAuth2TokenGenerator<*>,
        userService: CustomAuthUserService,
        encoder: PasswordEncoder,
        registeredClientRepository: RegisteredClientRepository
    ): SecurityFilterChain? {
        val authorizationServerConfigurer = OAuth2AuthorizationServerConfigurer()
        authorizationServerConfigurer
            .tokenEndpoint { tokenEndpoint: OAuth2TokenEndpointConfigurer ->
                tokenEndpoint
                    .accessTokenRequestConverter(
                        CustomGrantAuthenticationConverter()
                    )
                    .authenticationProvider(
                        CustomGrantAuthenticationProvider(
                            authorizationService,
                            tokenGenerator,
                            userService
                        )
                    )
            }.tokenIntrospectionEndpoint { tokenIntrospectEndpoint ->
                tokenIntrospectEndpoint
                    .introspectionRequestConverter(CustomIntrospectAuthenticationConverter())
                    .authenticationProvider(
                        CustomIntrospectAuthenticationProvider(
                            authorizationService,
                            registeredClientRepository
                        )
                    )
            }

        val endpointsMatcher = authorizationServerConfigurer.endpointsMatcher
        http
            .securityMatcher(endpointsMatcher)
            .authorizeHttpRequests { authorize ->
                authorize
                    .requestMatchers(HttpMethod.GET, "/actuator/health").permitAll()
                    .requestMatchers(HttpMethod.GET, "/swagger-ui.html", "/swagger-ui/**", "/v3/api-docs/**")
                    .permitAll()
                    .requestMatchers(HttpMethod.POST, "/oauth2/introspect").permitAll()
                    .anyRequest().authenticated()
            }
            .csrf { csrf -> csrf.ignoringRequestMatchers(endpointsMatcher) }
            .apply(authorizationServerConfigurer)
        authorizationServerConfigurer
            .authorizationService(authorizationService)
            .authorizationConsentService(authorizationContentService)

        return http.build()
    }
上記の Configuration を簡単に説明すると
SecurityFilterChain に設定した実装体が構成されました。次に、実際のカスタマイズのための Converter と Provider を実装します。
CustomGrantAuthenticationConverter
class CustomGrantAuthenticationConverter : AuthenticationConverter {
    override fun convert(request: HttpServletRequest): Authentication? {
        // grant_type (REQUIRED)
        val grantType = request.getParameter(OAuth2ParameterNames.GRANT_TYPE)
        if (SecurityConfiguration.CUSTOM_GRANT_TYPE != grantType && SecurityConfiguration.REFRESH_TOKEN_GRANT_TYPE != grantType) {
            return null
        }
        val clientPrincipal = SecurityContextHolder.getContext().authentication
        val parameters: MultiValueMap<String, String> = getParameters(request)
        val additionalParameters: MutableMap<String, Any> = HashMap()
        parameters.forEach { (key: String, value: List<String>) ->
            if (key != OAuth2ParameterNames.GRANT_TYPE &&
                key != OAuth2ParameterNames.CLIENT_ID &&
                key != OAuth2ParameterNames.CODE &&
                key != OAuth2ParameterNames.CLIENT_SECRET
            ) {
                additionalParameters[key] = value[0]
            }
        }
        return CustomGrantAuthenticationToken(AuthorizationGrantType(grantType), clientPrincipal, additionalParameters)
    }
    private fun getParameters(request: HttpServletRequest): MultiValueMap<String, String> {
        val parameterMap = request.parameterMap
        val parameters: MultiValueMap<String, String> = LinkedMultiValueMap(parameterMap.size)
        parameterMap.forEach { (key: String, values: Array<String?>) ->
            if (values.isNotEmpty()) {
                for (value in values) {
                    parameters.add(key, value)
                }
            }
        }
        return parameters
    }
}
Converterでは、Authenticationが委譲されてProviderへ渡される前に、基本的なリクエスト検証および変換を行うようにしました。Grant Typeを基本タイプとは別に宣言しているため、Custom Grant TypeとRefresh Token Grant typeであるかどうか程度のみを確認し、Provider検証用に変換して、OAuth2AuthorizationGrantAuthenticationTokenを実装したCustomGrantAuthenticationTokenとしてProviderへ渡します。
CustomGrantAuthenticationProvider
class CustomGrantAuthenticationProvider(
    private val authorizationService: OAuth2AuthorizationService,
    private val tokenGenerator: OAuth2TokenGenerator<out OAuth2Token>,
    private val userService: CustomAuthUserService
) : AuthenticationProvider {

    init {
        Assert.notNull(authorizationService, "authorizationService cannot be null")
        Assert.notNull(tokenGenerator, "tokenGenerator cannot be null")
    }

    @Throws(AuthenticationException::class)
    override fun authenticate(authentication: Authentication): Authentication {
        val customGrantAuthenticationToken: CustomGrantAuthenticationToken =
            authentication as CustomGrantAuthenticationToken

        val clientPrincipal = getAuthenticatedClientElseThrowInvalidClient(customGrantAuthenticationToken)
        val registeredClient = clientPrincipal.registeredClient

        if (!registeredClient!!.authorizationGrantTypes.contains(customGrantAuthenticationToken.grantType)) {
            throw OAuth2AuthenticationException(OAuth2ErrorCodes.UNAUTHORIZED_CLIENT)
        }
        val additionalParameters = customGrantAuthenticationToken.additionalParameters
        val scope = additionalParameters[OAuth2ParameterNames.SCOPE] as String?
        var userDetails: UserDetails? = null
        when (authentication.grantType.value) {
            SecurityConfiguration.CUSTOM_GRANT_TYPE -> {
                val username = additionalParameters[OAuth2ParameterNames.USERNAME] as String?
                    ?: throw OAuth2AuthenticationException("username not found.")
                val password = additionalParameters[OAuth2ParameterNames.PASSWORD] as String?
                    ?: throw OAuth2AuthenticationException("password not found.")

                userDetails = userService.loadUserByUsername(username, registeredClient.clientId)
                if (SecurityHelper.hashSHA512(password).trim() != (userDetails.password)) {
                    throw OAuth2AuthenticationException("password not matched.")
                }
            }

            SecurityConfiguration.REFRESH_TOKEN_GRANT_TYPE -> {
                val givenRefreshToken = additionalParameters[OAuth2ParameterNames.REFRESH_TOKEN] as String?
                authorizationService.findByToken(givenRefreshToken, OAuth2TokenType.REFRESH_TOKEN)
                    ?: throw OAuth2AuthenticationException("refresh token not matched.")
            }

            else -> throw OAuth2AuthenticationException("Not supported grant type.")
        }

        val tokenContext: OAuth2TokenContext = DefaultOAuth2TokenContext.builder()
            .registeredClient(registeredClient)
            .principal(clientPrincipal)
            .authorizationServerContext(AuthorizationServerContextHolder.getContext())
            .tokenType(OAuth2TokenType.ACCESS_TOKEN)
            .authorizationGrantType(customGrantAuthenticationToken.grantType)
            .authorizationGrant(customGrantAuthenticationToken)
            .authorizedScopes(setOf(scope))
            .build()
        userDetails?.let {
            (tokenGenerator as CustomDelegatingOAuth2TokenGenerator)
                .setCustomizer(
                    CustomDelegatingOAuth2TokenGenerator.GeneratorType.ACCESS_TOKEN,
                    CustomAccessTokenCustomizer((it as CustomUser))
                )
        }
        val generatedAccessToken = tokenGenerator.generate(tokenContext)
        if (generatedAccessToken == null) {
            val error = OAuth2Error(
                OAuth2ErrorCodes.SERVER_ERROR,
                "Token generator failed to generate the access token.",
                null
            )
            throw OAuth2AuthenticationException(error)
        }

        val accessToken = OAuth2AccessToken(
            OAuth2AccessToken.TokenType.BEARER,
            generatedAccessToken.tokenValue,
            generatedAccessToken.issuedAt,
            generatedAccessToken.expiresAt,
            setOf(scope)
        )
        val refreshTokenContext: OAuth2TokenContext = DefaultOAuth2TokenContext.builder()
            .registeredClient(registeredClient)
            .principal(clientPrincipal)
            .authorizationServerContext(AuthorizationServerContextHolder.getContext())
            .tokenType(OAuth2TokenType.REFRESH_TOKEN)
            .authorizationGrantType(customGrantAuthenticationToken.grantType)
            .authorizationGrant(customGrantAuthenticationToken)
            .authorizedScopes(setOf(scope))
            .build()
        val generatedRefreshToken = tokenGenerator.generate(refreshTokenContext)
        if (generatedRefreshToken == null) {
            val error = OAuth2Error(
                OAuth2ErrorCodes.SERVER_ERROR,
                "The token generator failed to generate the access token.",
                null
            )
            throw OAuth2AuthenticationException(error)
        }

        val refreshToken = OAuth2RefreshToken(
            generatedRefreshToken.tokenValue,
            generatedRefreshToken.issuedAt,
            generatedRefreshToken.expiresAt
        )

        val authorizationBuilder = OAuth2Authorization.withRegisteredClient(registeredClient)
            .principalName(clientPrincipal.name)
            .authorizationGrantType(customGrantAuthenticationToken.grantType)
        if (generatedAccessToken is ClaimAccessor) {
            authorizationBuilder.token(
                accessToken
            ) { metadata: MutableMap<String?, Any?> ->
                metadata[OAuth2Authorization.Token.CLAIMS_METADATA_NAME] =
                    (generatedAccessToken as ClaimAccessor).claims
            }.refreshToken(refreshToken).attribute("refresh_expires_in", refreshToken.expiresAt)
        } else {
            authorizationBuilder.accessToken(accessToken)
                .refreshToken(refreshToken).attribute("refresh_expires_in", refreshToken.expiresAt)
        }

        val authorization = authorizationBuilder.build()

        authorizationService.save(authorization)
        val attrib: MutableMap<String, Any?> = mutableMapOf(
            "refresh_expires_in" to refreshToken.expiresAt?.let {
                val currentInstant = Instant.now()
                val duration = Duration.between(currentInstant, it)
                duration.seconds
            }
        )
        userDetails?.let {
            attrib["x_custom_userinfo"] = (it as CustomUser).toDto()
        }
        return OAuth2AccessTokenAuthenticationToken(
            registeredClient,
            clientPrincipal,
            accessToken,
            refreshToken,
            attrib
        )
    }

    override fun supports(authentication: Class<*>): Boolean {
        return CustomGrantAuthenticationToken::class.java.isAssignableFrom(authentication)
    }

    private fun getAuthenticatedClientElseThrowInvalidClient(authentication: Authentication): OAuth2ClientAuthenticationToken {
        var clientPrincipal: OAuth2ClientAuthenticationToken? = null
        if (OAuth2ClientAuthenticationToken::class.java.isAssignableFrom(
                authentication.principal::class.java
            )
        ) {
            clientPrincipal = authentication.principal as OAuth2ClientAuthenticationToken?
        }
        if (clientPrincipal != null && clientPrincipal.isAuthenticated) {
            return clientPrincipal
        }
        throw OAuth2AuthenticationException(OAuth2ErrorCodes.INVALID_CLIENT)
    }
}
Provider の実装は、ライブラリでさまざまに提供されている複数の AuthenticationProvider 実装クラスのコードを参考にすれば、それほど難しくなく構成できます。Provider には、検証および refresh token の同時発行、そのほかユーザー情報の注入などの内容が実装されています。大きな特殊事項はありませんが、重要な実装ポイントが 1 つあります。
TokenGenerator 実装
userDetails?.let {
            (tokenGenerator as CustomDelegatingOAuth2TokenGenerator)
                .setCustomizer(
                    CustomDelegatingOAuth2TokenGenerator.GeneratorType.ACCESS_TOKEN,
                    CustomAccessTokenCustomizer((it as CustomUser))
                )
        }
OAuth2AccessTokenGenerator は、OAuth2TokenCustomizer の実装体リストをフィールドとして持ち、access token に対して適切なカスタマイズ処理を実行できます。しかし問題は、Spring Authorization Server が使用する DelegatingOAuth2TokenGenator の場合、OAuth2TokenCustomizer の実装体を動的に注入するための注入ポイントがなかったことです! (どうやって使えっていうんだ.. 😂 ) Access token response とは別に、Access token の情報に比べて機微ではないその他のユーザー情報を入れて Resource API で活用したかったため、Customizer を注入できる TokenGenerator を上で別途実装して注入しました。
CustomDelegatingOAuth2TokenGenerator & CustomAccessTokenCustomizer
class CustomDelegatingOAuth2TokenGenerator<T : OAuth2Token>(
    vararg tokenGenerators: OAuth2TokenGenerator<out T>
) : OAuth2TokenGenerator<T> {

    private val tokenGenerators: List<OAuth2TokenGenerator<out T>>

    init {
        Assert.notEmpty(tokenGenerators, "tokenGenerators cannot be empty")
        Assert.noNullElements(tokenGenerators, "tokenGenerators cannot contain null elements")
        this.tokenGenerators = tokenGenerators.toList()
    }

    @Nullable
    override fun generate(context: OAuth2TokenContext): T? {
        for (tokenGenerator in this.tokenGenerators) {
            val token = tokenGenerator.generate(context)
            if (token != null) {
                return token
            }
        }
        return null
    }

    fun setCustomizer(type: GeneratorType, customizer: OAuth2TokenCustomizer<OAuth2TokenClaimsContext>) {
        when (type) {
            GeneratorType.ACCESS_TOKEN -> {
                for (tokenGenerator in this.tokenGenerators) {
                    if (tokenGenerator is OAuth2AccessTokenGenerator) {
                        tokenGenerator.setAccessTokenCustomizer(customizer)
                    }
                }
            }

            else -> {}
        }
    }

    enum class GeneratorType {
        ACCESS_TOKEN,
        REFRESH_TOKEN
    }
}
class CustomAccessTokenCustomizer(
private val customUser: CustomUser
) : OAuth2TokenCustomizer<OAuth2TokenClaimsContext> {
override fun customize(context: OAuth2TokenClaimsContext?) {
val claimsBuilder = context?.claims
claimsBuilder?.claim("x_custom_userinfo", customUser.toDto())
}
}アクセストークンのclaimsにmap情報を追加するようcustomizerを作成し、動的にclaimを注入できるように実装しました。Providerでの検証後にsetCustomizerを呼び出して、xcustomuserinfo を入れられるようになりました。
tokenIntrospectionEndpointにも同様の方式で、token検証のためのCustomIntrospectAuthenticationConverterとCustomIntrospectAuthenticationProviderを実装して設定すれば、基本的な認証サーバーを稼働させる準備が完了します。
scopeまたは権限範囲設定など、残っている工程はまだ多いですが、上記のプロセスを経れば、開発チームで独自に認証プロトコルを構成できるようになります。
必ず注意しなければならない点は、認証のカスタマイズは公式プロトコルに準拠しなくなるため、セキュリティ脆弱性などを開発チーム自身で検証しなければならないということです。綿密なコードレビューとテストを必ず経てこそ、本番環境でようやく運用できるようになります。
終わりに
リファレンスがあまりない状態で、ライブラリを一つずつ確認しながらカスタマイズしていくのは少し大変でしたが、リファレンスがなかったからこそ、むしろより詳しく学べる機会になり、基本的な枠組みを整えてからはSpring Securityについてさらに明確に見通せるようになりました。それだけでなく、リファレンス不足で難関に直面したり、Spring securityを活用して国際プラットフォーム認証の実装や他機関認証との連携など、多様な要件を柔軟に受け入れようとする開発者にとっても役立てばうれしく思います。それでは、この記事をここで締めくくります。お読みいただきありがとうございました。