Hello. I am backend developer Jongin Park.
In developing web servers, more and more systems are being built asynchronously in order to handle more requests with the same resources.
Internally, we prepared and conducted a seminar on this topic to improve our understanding of asynchronous processing, especially the event loop-based asynchronous processing model that we currently use in most cases.
And because we thought the content of this seminar could also help others outside our company understand how the event loop works, we decided to share the related content in this way.
In this post, without using Python's asyncio library or the await & async syntax, we will build a simple server that receives requests asynchronously using sockets directly, and in the process, we will look into the principles of the event loop, the core element of the asyncio library.## 1. A Basic Telnet Server
First, let's create a server that simply echoes back the contents of a request when it receives one from a Telnet client.
1.1. Let's first make sure we can receive requests properly
The following code is a server that accepts TCP connection requests on port 12345. If you make a request to port 12345 using a Telnet client, the request will be handled by the code inside the runserver function.
# basic_server.py
import socket


def runserver():
    # Create a listening socket
    server_socket = socket.socket(socket.AF_INET, socket.SOCK_STREAM)
    server_socket.setsockopt(socket.SOL_SOCKET, socket.SO_REUSEADDR, 1)
    server_socket.bind(('0.0.0.0', 12345))
    server_socket.listen()

    connection_socket, client_address = server_socket.accept()
    print(f"Connection established with {client_address}")

    data = connection_socket.recv(1024)
    print(data)
    connection_socket.close()


if __name__ == "__main__":
    runserver()
1.1.1. How it works
Let's go through the code above line by line.
- Create the socket to be used by the server.
server_socket = socket.socket(socket.AF_INET, socket.SOCK_STREAM)socket.AF_INET refers to the IPv4 address family.
socket.SOCK_STREAM refers to TCP.
In other words, the code above creates a TCP socket using the IPv4 address family and assigns it to server_socket.
- Add a simple option to the socket for convenience during practice.
server_socket.setsockopt(socket.SOL_SOCKET, socket.SO_REUSEADDR, 1)socket.SOL_SOCKET means that the setting will be defined at the socket level. In this argument position, you could use socket.IPPROTO_IP to configure IP-level settings or socket.IPPROTO_TCP to configure TCP-level settings, but since a deeper explanation would go beyond the scope of this post, we'll skip that for now. For the moment, you can simply think of it as an argument expressing the intent to configure the socket.
socket.SO_REUSEADDR means that this socket will reuse the address. Here, address refers to the IP and PORT pair. By using this option, we prevent the Address already in use error when turning the server on and off.
1 is the flag that enables the socket.SO_REUSEADDR option above.
- Bind the socket to port 12345 on address 0.0.0.0.
server_socket.bind(('0.0.0.0', 12345))0.0.0.0 is a special IP that refers to all network interfaces on the server computer. In other words, (‘0.0.0.0’, 12345) means that the socket will handle communication coming in through port 12345 across all network interfaces, such as Ethernet and Wi-Fi.
If you want to test only locally, it's also fine to use 127.0.0.1, which is the loopback interface and points to localhost.
- Start LISTEN on the socket.
server_socket.listen()Now the server is ready to accept TCP connections coming into port 12345 on this computer.
- Wait until a request comes in.
connection_socket, client_address = server_socket.accept()When a TCP connection request comes into port 12345 on this server, the connection is established and the connection_socket object and the client's address (IP, PORT) are returned.
Before a connection request comes into the server, execution does not proceed to the next line of code.
- Process the request and close the connection.
data = connection_socket.recv(1024)
print(data)
connection.close()- In the figure below,
server_sockerandconnection_socketcorrespond to the welcoming socket and the connection socket, respectively.
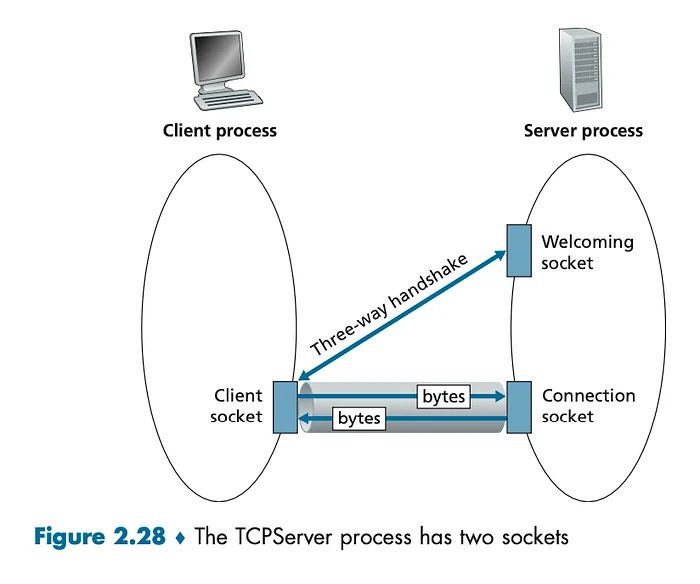
When the server receives a request on the socket bound to the port 12345 that we configured, it creates one additional socket, and that socket is used to exchange data with the client. This additional socket is the connection_socket.
1.1.2. Try running it
- Save the code above as a file named
basic_server.pyand run it in the terminal.
python basic_server.py- Open another terminal and connect the Telnet client to localhost 12345.
telnet localhost 12345

# You can see stdout like the following
Trying 127.0.0.1...
Connected to localhost.
Escape character is '^]'.- Send a message from the Telnet client.
hi
Connection closed by foreign host.
When you send the message hi, the code connection_socket, client_address = server_socket.accept() proceeds, data = connection.recv(1024) reads hi and assigns it to data, and then print(data) outputs hi in the terminal where basic_server.py is running.
Finally, when the connection is terminated at the connection_socket.close() line, the connection closes with the message Connection closed by foreign host. shown in the terminal.
1.1.3. Parts that need improvement
- At the moment, since it handles only one connection and immediately calls
connection_socket.close(), it would be better if the connection remained open even when multiple messages are sent from the Telnet client.
- At the moment, in the Telnet client terminal, you can only see the hi that you typed yourself. To make an echo server, we need code on the server side that sends the hi received from the client back to the client.
1.2. Let's build an echo server
The following is the code for a server that fixes the issue in the code above of handling only one connection and then closing it, and also adds the ability to echo messages sent through the connection.
# echo_server.py
import socket


def runserver():
    server_socket = socket.socket(socket.AF_INET, socket.SOCK_STREAM)
    server_socket.setsockopt(socket.SOL_SOCKET, socket.SO_REUSEADDR, 1)
    server_socket.bind(('0.0.0.0', 12345))
    server_socket.listen()

    while True:
        connection_socket, client_address = server_socket.accept()
        print(f"Connection established with {client_address}")

        while True:
            data = connection_socket.recv(1024)
            print(data)
            msg = b'echo: '
            msg += data
            connection_socket.send(msg)

            if data == b'bye\r\n':
                connection_socket.close()
                break


if __name__ == "__main__":
    runserver()
1.2.1. What changed
Let's take a look only at the parts that changed.
data = connection_socket.recv(1024)
print(data)
connection_socket.close()
From the original logic that received data only once and then closed the connection,
while True:
    data = connection_socket.recv(1024)
    print(data)
    msg = b'echo: '
    msg += data
    connection_socket.send(msg)

    if data == b'bye\r\n':
        connection_socket.close()
        break
it was changed to logic that keeps looping until the data bye arrives, receiving data from the connection and then sending that message back.
With this update, the functionality was improved as follows.
bye through telnet.1.2.2. Trying it out
- Run the code.
python echo_server.py- Open one more terminal and run the following command.
telnet localhost 12345

# You can check stdout like the following
Trying 127.0.0.1...
Connected to localhost.
Escape character is '^]'.- Unlike 3. in 1.1.2., you can now send hi multiple times.
hi
echo: hi
hi
echo: hi
hi
echo: hi
hi
echo: hi
hi
echo: hi- Close the connection with bye.
bye
echo: bye
Connection closed by foreign host.
2. A non-blocking asynchronous echo server that handles multiple connections
Python WSGI implementations ultimately operate in the same way as above when creating connections.
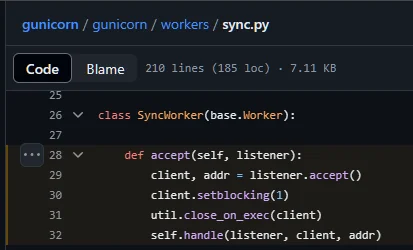
Here, multiple threads or multiple processes are used to receive several connections at the same time. However, our goal is to build a server that can receive multiple requests asynchronously within a single process. And this is how ASGI implementations work. From here on, we will gradually improve the server in that direction.
2.1. Changing the code to non-blocking
The reason the existing server can receive only one connection is that, in the following code, the program stops until a Telnet request arrives, so the outer while loop does not continue iterating.
while True:
    connection_socket, client_address = server_socket.accept()
When one line of code does not move on to the next line until it finishes its job, this is called blocking.
In this case, while the code above is blocked, it is simply waiting for a connection from the client, so the CPU does not do any processing at all. Since this is inefficient, the first step toward receiving multiple connections asynchronously is to make the loop continue iterating even if no connection arrives.
Get 개발팀’s stories in your inbox
Therefore, if you write the code as follows, you can make the while loop keep iterating even when no connection arrives.
import socket


def runserver():
    server_socket = socket.socket(socket.AF_INET, socket.SOCK_STREAM)
    server_socket.setsockopt(socket.SOL_SOCKET, socket.SO_REUSEADDR, 1)
    server_socket.bind(('0.0.0.0', 12345))
    server_socket.listen()
    server_socket.setblocking(False)

    while True:
        try:
            connection_socket, client_address = server_socket.accept()
            print(f"Connection established with {client_address}")
        except BlockingIOError:
            continue

        while True:
            try:
                data = connection_socket.recv(1024)
            except BlockingIOError:
                continue

            print(data)
            msg = b'echo: '
            msg += data
            connection_socket.send(msg)

            if data == b'bye\r\n':
                connection_socket.close()
                print(f"connection with {client_address} closed")
                break


if __name__ == "__main__":
    runserver()
2.1.1. What changed
- One line of code was added to the part that creates the server socket.
server_socket = socket.socket(socket.AF_INET, socket.SOCK_STREAM)
server_socket.setsockopt(socket.SOL_SOCKET, socket.SO_REUSEADDR, 1)
server_socket.bind(('0.0.0.0', 12345))
server_socket.listen()
server_socket.setblocking(False) # 추가된 부분
If you set .setblocking(False) on a socket, then when a function such as .accept() or .recv() that expects an action from the client side is called, and there is no action from the client, it raises a BlockingIOError Exception.
- If there is no attempt to establish a connection from the client and the call to
.accept()raises aBlockingIOErrorException, we pass over it so that the code can continue executing.
while True:
    try:                                # 추가된 부분
        connection_socket, client_address = server_socket.accept()
        print(f"Connection established with {client_address}")
        connections.append(connection)  # 추가된 부분
    except BlockingIOError:             # 추가된 부분
pass # 추가된 부분- When receiving client data from a connection, if the client has not sent any data yet and the call to
.recv(1024)raises aBlockingIOErrorException, we pass over it so that the code can continue executing.
while True:
    try:                     # 추가된 부분
        data = connection_socket.recv(1024)
    except BlockingIOError:  # 추가된 부분
        continue             # 추가된 부분

    print(data)
As a result, the server can continue running the while loop even when there is no action from the client. However, it still can receive only one connection. Now, with just one more step, this server will be able to receive multiple connections.
2.2. Handling multiple connections
The following code is an improved version of the code in 2.2.1. to receive multiple connections.
import socket


def runserver():
    server_socket = socket.socket(socket.AF_INET, socket.SOCK_STREAM)
    server_socket.setsockopt(socket.SOL_SOCKET, socket.SO_REUSEADDR, 1)
    server_socket.bind(('0.0.0.0', 12345))
    server_socket.listen()
    server_socket.setblocking(False)
    connections = []

    while True:
        try:
            connection_socket, client_address = server_socket.accept()
            print(f"Connection established with {client_address}")
            connections.append(connection_socket)
        except BlockingIOError:
            pass

        for connection_socket in connections:
            try:
                data = connection_socket.recv(1024)
            except BlockingIOError:
                continue

            print(f"send to {client_address}: {data}")
            msg = b'echo: '
            msg += data
            connection_socket.send(msg)

            if data == b'bye\r\n':
                connection_socket.close()
                print(f"connection with {client_address} closed")
                connections.remove(connection_socket)
                break


if __name__ == "__main__":
    runserver()
2.2.1. What changed
- We added a list declaration to hold multiple connections, as follows.
server_socket = socket.socket(socket.AF_INET, socket.SOCK_STREAM)
server_socket.setsockopt(socket.SOL_SOCKET, socket.SO_REUSEADDR, 1)
server_socket.bind(('0.0.0.0', 12345))
server_socket.listen()
server_socket.setblocking(False)
connections = [] # 추가된 부분- The part that previously waited only for
recvfrom a single connection was improved to iterate over theconnectionslist and performrecvfrom multiple connections.
for conn in connections:  # 변경된 부분
    try:
        data = connection_socket.recv(1024)
    except BlockingIOError:
continue- On the client side, we added code to remove the connection from the
connectionslist when the connection is closed.
if data == b'bye\r\n':
    connection_socket.close()
    print(f"connection with {client_address} closed")
    connections.remove(connection_socket)    # 추가된 부분
    break                                    # 추가된 부분
As a result, this server program has become an asynchronous server that can handle multiple connections with just a single process. However, this program currently has a critical problem: it continuously repeats the while loop and consumes all CPU resources. On the other hand, if we make the loop sleep for 1 second at a time, the client will experience delays equal to the server's sleep time. In the next part, we will solve this problem.
3. Asynchronous echo server using I/O event notification
3.1. Using I/O events
The OS we use provides APIs that let a process receive notifications when I/O events such as reads or writes occur on a file.
- Linux: epoll
- MacOS: kqueue
- Windows: IOCP
In Python, you can use these APIs through a library called selectors. Since sockets are essentially files as well, these APIs can also be used with sockets. Therefore, by subscribing to I/O events on sockets and receiving notifications when changes occur on those sockets, there is no longer any need to spin endlessly through a while loop just to wait for client actions.
First, let's look at the server implementation using selectors, and then examine one by one how it was improved.
import selectors
import socket


def runserver():
    server_socket = socket.socket(socket.AF_INET, socket.SOCK_STREAM)
    server_socket.setsockopt(socket.SOL_SOCKET, socket.SO_REUSEADDR, 1)
    server_socket.bind(('0.0.0.0', 12345))
    server_socket.listen()
    server_socket.setblocking(False)

    selector = selectors.DefaultSelector()
    selector.register(server_socket, selectors.EVENT_READ)

    while True:
        events = selector.select(timeout=1)

        if len(events) == 0:
            continue

        for event, _ in events:
            event_socket = event.fileobj

            if event_socket == server_socket:
                connection_socket, client_address = server_socket.accept()
                print(f"Connection established with {client_address}")
                selector.register(connection_socket, selectors.EVENT_READ)
            else:
                connection_socket = event_socket
                data = connection_socket.recv(1024)
                msg = b'echo: '
                msg += data
                connection_socket.send(msg)

                if data == b'bye\r\n':
                    connection_socket.close()
                    print(f"connection with {client_address} closed")
                   break


if __name__ == "__main__":
    runserver()
3.2. What changed
- We added the part that subscribes to I/O events on the socket.
selector = selectors.DefaultSelector()
selector.register(server_socket, selectors.EVENT_READ)
In the code above, we create a seletor object and configure it so that the object receives notifications about read events on server_socket, that is, notifications about incoming connection creation requests.
- Wait for I/O events from the sockets registered in
selector.
while True:
    events = selector.select(timeout=1)

    if len(events) == 0:
        continue
In the code above, the server waits for 1 second for requests from clients on the sockets registered in the selector object. After 1 second passes, execution proceeds to the next code and reaches the if len(events) == 0: part. If there were no events for 1 second, the while loop continues because of continue.
This is the important part of the code. In the earlier code, the while loop ran nonstop, checking whether sockets had client requests and consuming all CPU resources in the process. But in this code, through selector, we can delegate the task of checking whether sockets have client requests to the OS via APIs such as epoll or kqueue. The OS performs this task efficiently without using CPU.
- If there was a request from a client, retrieve the corresponding socket.
for event, _ in events:
    event_socket = event.fileobj
aWhen you iterate over events in a for loop, each item is unpacked into a SelectorKey object's event and an int-type file descriptor number _. Since the file descriptor number is not used, it is unpacked into _.
If you inspect the SelectorKey object's fileobj property, you can get a socket object on which calls such as .accept and .recv are possible.
The event_socket received here may be the server_socket that received a connection request, or it may be a connection_socket waiting for the server's response.
In fact, up to this point, it may be hard to understand how event_socket could also be a connection_socket, since no notifications have yet been subscribed to on connection_socket. But this will be explained immediately in section 4.
- If
event_socketisserver_socket, this means a connection creation request has arrived, so accept the connection and add it to theconnectionslist.
if event_socket == server_socket:
    connection_socket, client_address = server_socket.accept()
    print(f"Connection established with {client_address}")
    selector.register(connection_socket, selectors.EVENT_READ)
If you look at the last line of the code above, just as we did for server_socket in 1 above, we also subscribe to I/O events on connection_socket. This makes it possible for event_socket to be a connection_socket as well.
- If
event_socketisconnection_socket, this means the client sent a request to the server through the connection, so send back an echo response.
else:
    connection_socket = event_socket
    data = connection_socket.recv(1024)
    msg = b'echo: '
    msg += data
connection_socket.send(msg)- And don't forget to clean up the connection when a connection close request comes in.
if data == b'bye\r\n':
    connection_socket.close()
    print(f"connection with {client_address} closed")
   break
With this improvement, we implemented a server that can receive multiple requests asynchronously with just a single server process, without excessively occupying CPU resources.
4. Comparing with the actual implementation of asyncio's Event Loop
In this part, we will explore asyncio's event loop based on the server we implemented above.
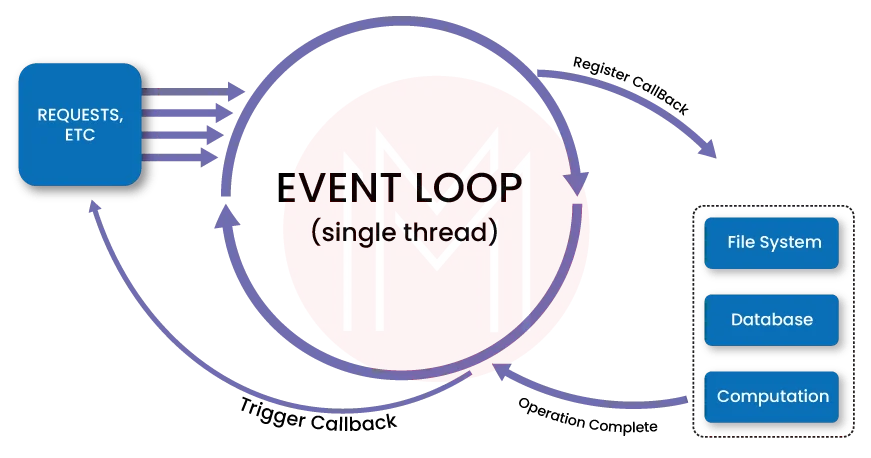
In fact, while implementing the asynchronous server with selectors above, we already created a simple event loop. The code in section 3.2, part 1, is precisely a simplified event loop.
while True:
    events = selector.select(timeout=1)

    if len(events) == 0:
        continue

    ...
With this idea in mind, let's look at how the event loop is actually implemented in asyncio.
If you look at BaseEventLoop.run_forever, you can find a while: true statement. (benoitc et al, 2023)
def run_forever(self):
    """Run until stop() is called."""

  ...

  events._set_running_loop(self)
  while True:
      self._run_once()
      if self._stopping:
          break
  ...
Let's look at the definition of self._run_once inside while: true.
def _run_once(self):
    """Run one full iteration of the event loop.

    This calls all currently ready callbacks, polls for I/O,
    schedules the resulting callbacks, and finally schedules
    'call_later' callbacks.
    """

  ...

  event_list = self._selector.select(timeout)
  self._process_events(event_list)

  ...
As you can see from the excerpt above, you can confirm that asyncio also uses the selectors we used.
This ultimately becomes similar to the code from section 3.2-2.
while True:
    events = selector.select(timeout=1)

    if len(events) == 0:
        continue
If you then look at the implementation of _process_events that is called next, it is as follows.
def _process_events(self, event_list):
   for key, mask in event_list:
       fileobj, (reader, writer) = key.fileobj, key.data
       if mask & selectors.EVENT_READ and reader is not None:
           if reader._cancelled:
               self._remove_reader(fileobj)
           else:
               self._add_callback(reader)
       if mask & selectors.EVENT_WRITE and writer is not None:
           if writer._cancelled:
               self._remove_writer(fileobj)
            else:
               self._add_callback(writer)
If you look at the first part of the loop, you can see that it is similar to part 3 of section 3.2.
for event, _ in events:
    event_socket = event.fileobj
In asyncio's event loop, it is implemented to cover not only read I/O events but also more general cases.
In this way, you can also see that asyncio's event loop implements asynchronous behavior by waiting for I/O events using selectors inside a while: true statement.
5. Conclusion
So far, we have looked at how to implement an asynchronous non-blocking server without asyncio, and through this, we examined the principles of the event loop provided by asyncio.
event loop ultimately means a loop that controls I/O events inside while: true.
Then, the next thing to think about will be what exactly asyncio's Coroutine is. In the near future, we will also cover a post about Coroutine.
References:
benoitc. (2014, October 25). optimize the sync worker. https://github.com/benoitc/gunicorn/commit/4c601ce447fafbeed27f0f0a238e0e48c928b6f9
benoitc, et al. (2023, December 7). n.d. https://github.com/benoitc/gunicorn/blob/9802e21f779d9f1f208a1a3288218bd5b843ad46/gunicorn/workers/sync.py
James F. Kurose & Keith W. Ross. (2022). Computer Networking A Top-Down Approach (8th edition). Pearson.
mindmajix, (2023, April 4), Express JS Interview Questions https://mindmajix.com/express-js-interview-questions