Hello, I’m Riiid Software Engineer Junyeol Park.
Recently, I gave a presentation at an internal web technology sharing event about React Server Components, the importance of Streaming, and new Data Fetch patterns.
Since the presentation was well received by our team members as being helpful, I decided to write this blog post to share it externally as well.
I hope it will be helpful to many of you.
Launch of the App Router
It has already been over two years since NextJS’s much-debated App Router was introduced.At first, many people questioned whether it was really necessary to use the App Router when the Pages Router already existed. However, thanks to the NextJS team’s continuous support and effort, most new projects are now being started with the App Router instead of the Pages Router.
However, there are still not many people who clearly understand why they should use the App Router and how to properly use React Server Components.
Through this article, I hope many people can clearly understand why React Server Components are used and how to use them properly to maximize performance.
This article does not focus on explaining what React Server Components are, but rather on performance improvements using React Server Components and new Data Fetch patterns.
React Server Components? How are they different from Server Side Rendering?
When React Server Components were first announced, one of the biggest points of confusion for many people was how they differed from the existing Server Side Rendering (SSR).
React Server Components and Server Side Rendering are similar, but there is a clear difference.
The commonality is that in both technologies, the function that creates components runs in the BFF(Backend For Frontend).
The differences are as follows.
This is where one of the key advantages of React Server Components appears. Because this component’s code is executed only in the BFF, it can be completely removed from the JS bundle delivered to the client.
In other words, you can reduce the bundle size!
But there are not only advantages.
While the size of the JS bundle sent to the Client decreases, the size of the HTML actually increases due to how React Server Components work.
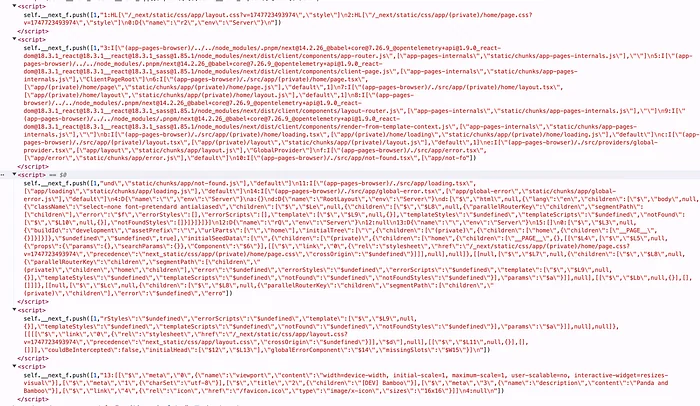
If you inspect the Elements of a web page using the App Router, you will see tags like the following.
<script>self.__next_f.push(...)</script>These tags are the Payload of React Server Components, and they contain the information needed for React Server Components to work.
For example, information such as the following is all appended to the end of the HTML in the form of .
It would be great to dive deeper into React Server Components and Payload, but since this article focuses on how to make good use of React Server Components, I’ll cover it in more depth another time if the opportunity arises.
Data Fetch, where is the best place to do it?
Today’s main topic is where it is best to do Data Fetch.
Thanks to frameworks that support a BFF like NextJS, there is now an option to perform Data Fetch in the BFF. Of course, there are still many cases where Data Fetch is done on the Client as before, because authentication management becomes more complex or the need is not strongly felt.
However, where and how you perform Data Fetch has a major impact on user experience.
Therefore, choosing the right pattern for the situation is extremely important.
The following are three major Data Fetch patterns.
Let’s go through each Data Fetch pattern step by step and see how user experience can be maximized.
All examples assume a situation where the user accesses the Main Page, everything has already finished loading, and then routes to the Detail Page.
1. Client Data Fetch
The first pattern is the most familiar one: performing Data Fetch on the Client.
Typically, this is done using useEffect, or through libraries such as Tanstack Query or SWR.
Detailed flow
Among these, the point at which the user can check meaningful information on the detail page is
when step 4, the page re-renders based on the actual data after the response has been received.
This is because the UI containing what the user expects can only be provided after the necessary information is fetched through Data Fetch.
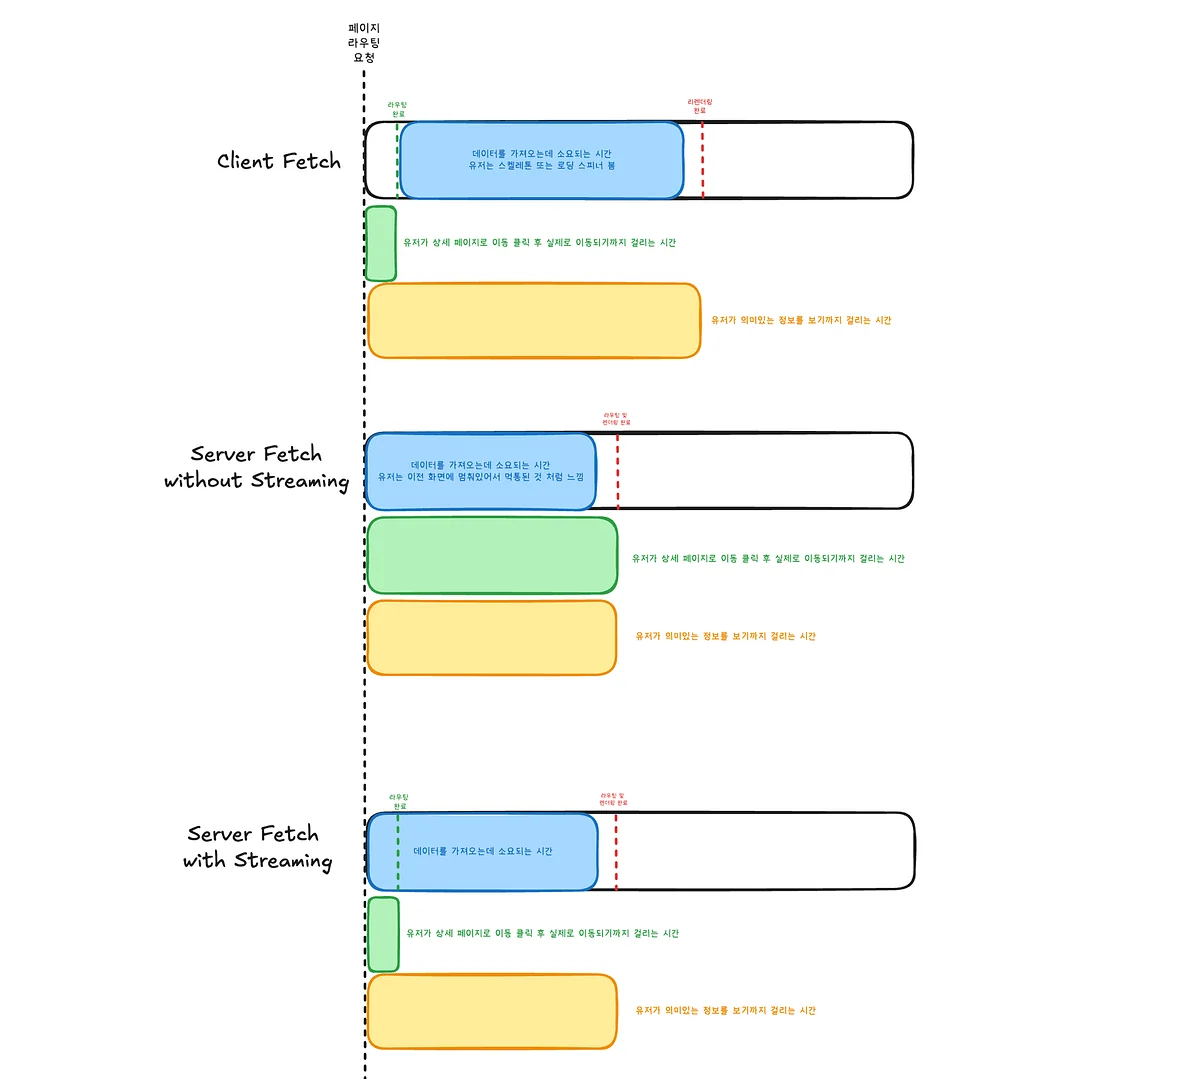
If we visualize the time taken for each step,
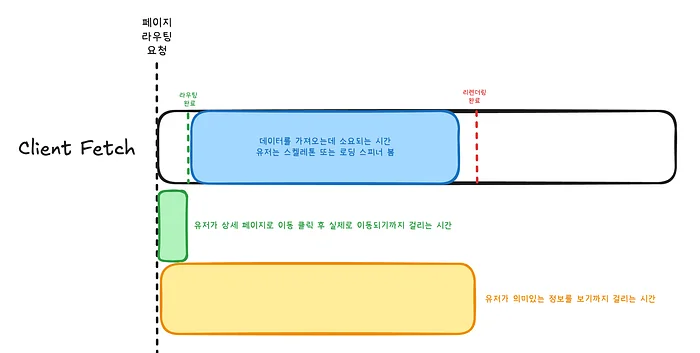
Process 1 and process 2 take the amount of time shown by the green box,
process 3 takes the amount of time shown by the blue box,
and finishing everything through process 4 takes the amount of time shown by the yellow box.
The two metrics to pay close attention to here are the sizes of the green box and the yellow box.
The green box is the time it takes from when the user clicks routing until the actual navigation happens,
and the yellow box is the time it takes from when the user clicks routing until they can check meaningful information.
The larger the green box, the more users feel that the service is not responding quickly, leading to frustration.
The larger the yellow box, the longer users actually wait for data, making the app feel slow.
Advantages of Client Data Fetch
Disadvantages of Client Data Fetch
2. Server Data Fetch without Streaming
The second pattern is a method where, when the user routes to the detail page, the BFF generates the page and returns the completed page to the Client all at once.
This pattern appears in the following situations.
In other words, if a NextJS-based website takes a long time from click to page navigation, you can assume it is using this pattern.
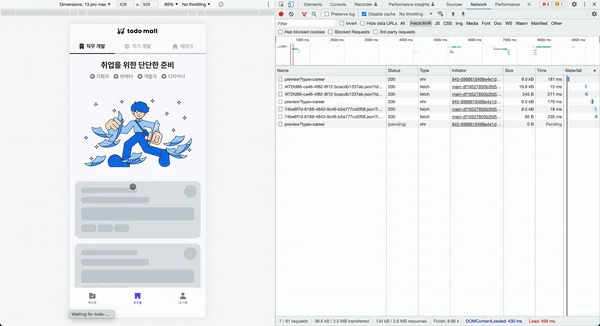
If you look closely at the image above, you can see that after the user clicks to move pages, there is a delay of about 500ms before the app actually navigates to the page.
The following is the detailed page loading process for the second pattern.
If we visualize this process again,
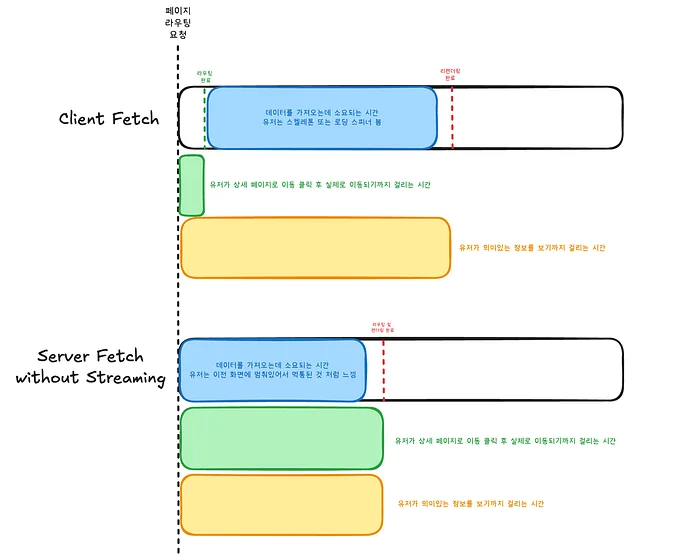
The three main differences compared with Client Data Fetch are as follows.
A particularly important point is that, in this approach, the blue box size is smaller than in the Client Data Fetch approach.
Since the BFF that performs Data Fetch is ultimately a kind of server, it has the following advantages.
What is noteworthy is that the time until the user can actually see meaningful information (the size of the yellow box) is smaller than with Client Data Fetch.
This is possible for the following reasons.
However, the biggest drawback of Server Data Fetch without Streaming is that the interaction response speed (the green box), which I consider the most important, is significantly larger compared with Client Data Fetch.
Although users can receive meaningful information more quickly, the time until routing to the actual page after a click becomes longer, causing considerable frustration for users.
Some may ask the following question.
“In the end, don't both Client Fetch and Server Fetch still wait for an API request? If so, wouldn't the method that lets users see meaningful information sooner be better?”
However, from the perspective of actual user experience, this simple comparison does not hold.
A famous similar example is the anecdote about a slow elevator and installing mirrors.

In the past, users in a certain building continuously complained that the elevator was too slow. However, technically, it was difficult to improve the elevator's speed.
So the manager installed a large mirror inside the elevator. After that, user complaints decreased significantly.
The reason is that users are more sensitive not to the actual waiting time, but to the perceived waiting time.
Previously, they were simply standing in the elevator waiting, which made the wait feel even longer. But after the mirror was installed, users spent time looking at themselves, making the wait feel less boring, and naturally complaints about the speed also decreased.
Exactly the same principle applies to web applications.
There are technical limits to dramatically improving the API response speed itself. From the actual user's perspective, rather than the physical time it takes to receive data, the overall perceived speed of the app changes depending on the visual feedback provided while waiting (loading skeletons, animations, fun elements, etc.).
Therefore, from a UX perspective, the most important thing is to provide appropriate feedback UI and skeleton handling that can reduce the user's perceived waiting time.
On the contrary, if SSR (Server Side Rendering) is used improperly, users may feel that the service is slower.
3. Server Data Fetch with Streaming
So far, we have examined Client Data Fetch and Server Data Fetch without Streaming, identifying the pros and cons of each.
What if there were a magical pattern that combines only the advantages of both patterns?
The fast response speed and Skeleton UI, which are advantages of Client Data Fetch,
and the short loading time, which is an advantage of Server Data Fetch without Streaming, together make up Server Data Fetch with Streaming.
Surprisingly, there is only one thing needed to gain just these two advantages:
adding the loading.tsx file!
In NextJS's App Router, adding loading.tsx has the same effect as internally wrapping the entire page in Suspense.
When a child component wrapped in Suspense enters a suspend state during rendering, it shows the fallback component of the nearest Suspense Boundary until completion.
Typical situations in which a component enters a suspend state are as follows.
In these situations, the Suspense Boundary's fallback is shown until rendering is complete.
In other words,
Ultimately, Server Data Fetch with Streaming is an ideal pattern that naturally combines these two advantages.
As a result, thanks to Suspense, the following advantages are possible.
In other words, the pattern that combines only the advantages of the two patterns described earlier (Client Data Fetch and Server Data Fetch without Streaming) is precisely Server Data Fetch with Streaming.
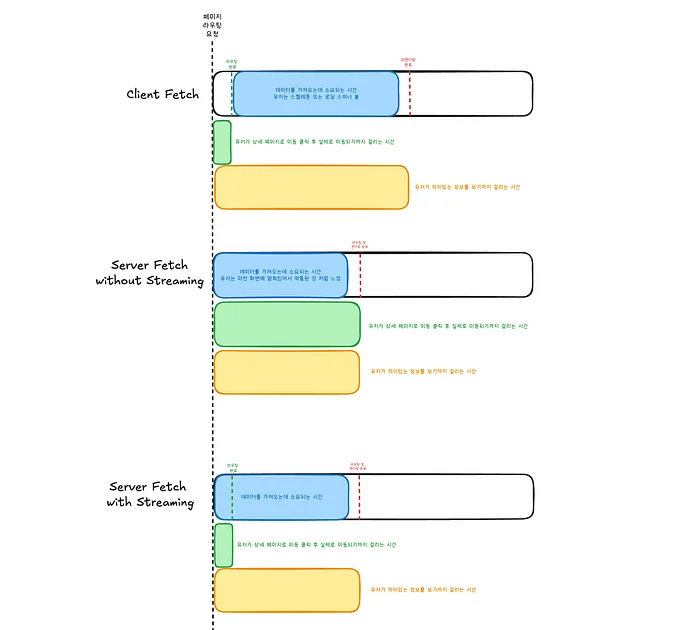
To visualize and summarize what we looked at earlier, it is as follows.
Therefore, if you are using the NextJS App Router, be sure to add a loading.tsx file to take advantage of Server Data Fetch with Streaming!
Get Eric Park’s stories in your inbox
When the App Router was first released, I think people’s frustration with the major and frequent changes that had accumulated in NextJS over time exploded, and they focused more on the drawbacks and inconveniences of the App Router than on its advantages.
However, the more deeply I studied the App Router,
the more I realized that the NextJS team had put in an enormous amount of research and effort to overcome the limitations and problems of the existing Pages Router.
Among them, I think the most representative features are Streaming and compatibility with React Server Components.
Through the explanation above, we were able to confirm that Streaming is extremely important for user experience.
The existing Pages Router did not support Streaming, so it was slow.
Also, if you did not properly utilize Static Site Generation(SSG) or Incremental Static Regeneration(ISR) and used only Server Side Rendering(SSR), it could actually degrade the user experience.
On the other hand, in the App Router, with the introduction of React Server Components for the first time,
SSR, which had previously only been possible at the page level in the existing Pages Router, became possible at the component level, and this further strengthened the effectiveness of Streaming.
Through Streaming, users can first see the parts that can be shown in advance, and then see the parts that are prepared later afterward.
In the existing Pages Router, since it was impossible to perform Server Side Rendering(SSR) at the component level, the practical benefits of Streaming were limited.
However, with the introduction of React Server Components, component-level SSR became possible, and because of this, Streaming was finally able to truly shine.
For example, let’s assume that 90% of a page is Static and only 10% is Dynamic.
In the existing Pages Router, even if most of the page was Static, the entire page would suspend because of the partially Dynamic section, so users had to wait for all the content.
In contrast, because the App Router made component-level Server Side Rendering and Streaming possible, even if some components are prepared slowly, the other components that are already ready can be rendered first and shown to users quickly.
In other words, users can experience the page faster.
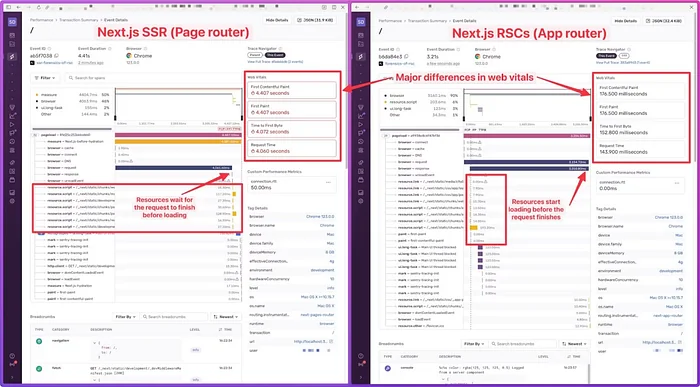
The screenshot above shows the result of implementing the same page with only the difference between the Pages Router and the App Router.
Even with the same page and the same data, the loading timing of page resources changes depending on whether Streaming is used, which ultimately has a major impact on Web Vitals metrics and user experience. This can ultimately have a direct impact on revenue as well.
Therefore, if there is just one thing you should remember from this article,
If you are using the App Router, be sure not to forget to create the loading.tsx file!
4. (An extra topic, but the main purpose of this article) A great pattern for narrowing the scope of what must wait
From the above, we learned that the most ideal approach is to perform Data Fetch on the BFF server and deliver the page to the Client through Streaming.
However, in actual development, there are quite a few situations where you inevitably have to use Client Components instead of Server Components because state management, interaction handling, or the use of React Hooks is required.
In these situations, some people may think, “There’s no choice but to do Client Data Fetch,” and give up the advantages explained earlier.
For exactly those people, I’d like to introduce one useful pattern!
Let’s assume a page situation like the following.
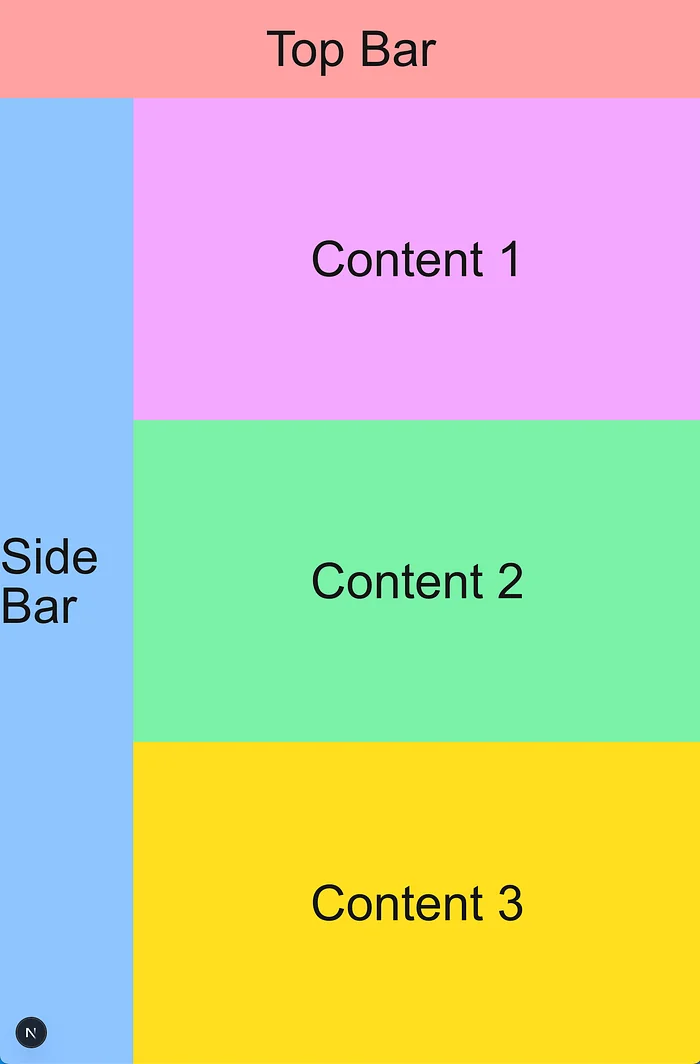
This is a very typical page structure, and if we look at it in the form of a tree,
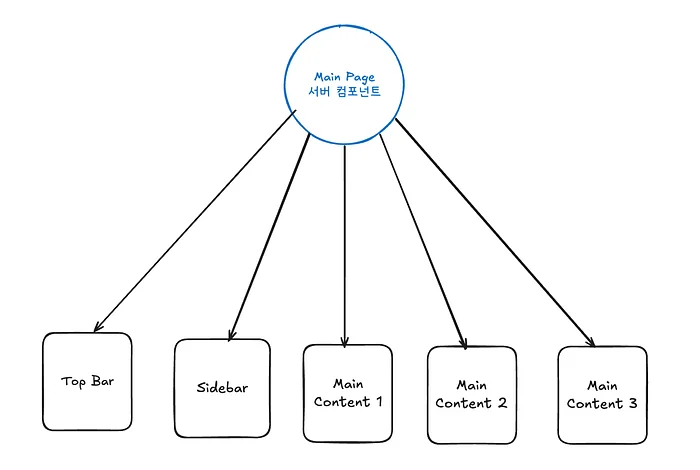
it can be viewed like this.
As new functionality is added, let’s assume that the Main Content 1 component now needs to use data fetched by calling an API.
At this point, to leverage the advantages of Server Data Fetch that we learned earlier, we can use the following method.
If you do this, you can deliver meaningful information to users faster than by having the Client Component fetch the data directly.
export default async function Home() {
  const data = await getData();

  return (
    <div className={cn('h-screen w-screen bg-white flex flex-col')}>
      <TopBar />
      <div className={cn('flex-1 w-full flex')}>
        <SideBar />
        <div className={cn('flex flex-col w-full')}>
          <ContentOne data={data}/>
          <ContentTwo />
          <ContentThree />
        </div>
      </div>
    </div>
  )
}
However, this approach has one very big problem:
Having Main Page perform the Data Fetch means that,
- the rendering of Main Page becomes Suspended,
- the Suspense Boundary (
loading.tsx) wrapping Main Page is triggered, - and the entire Main Page ends up showing the Fallback.
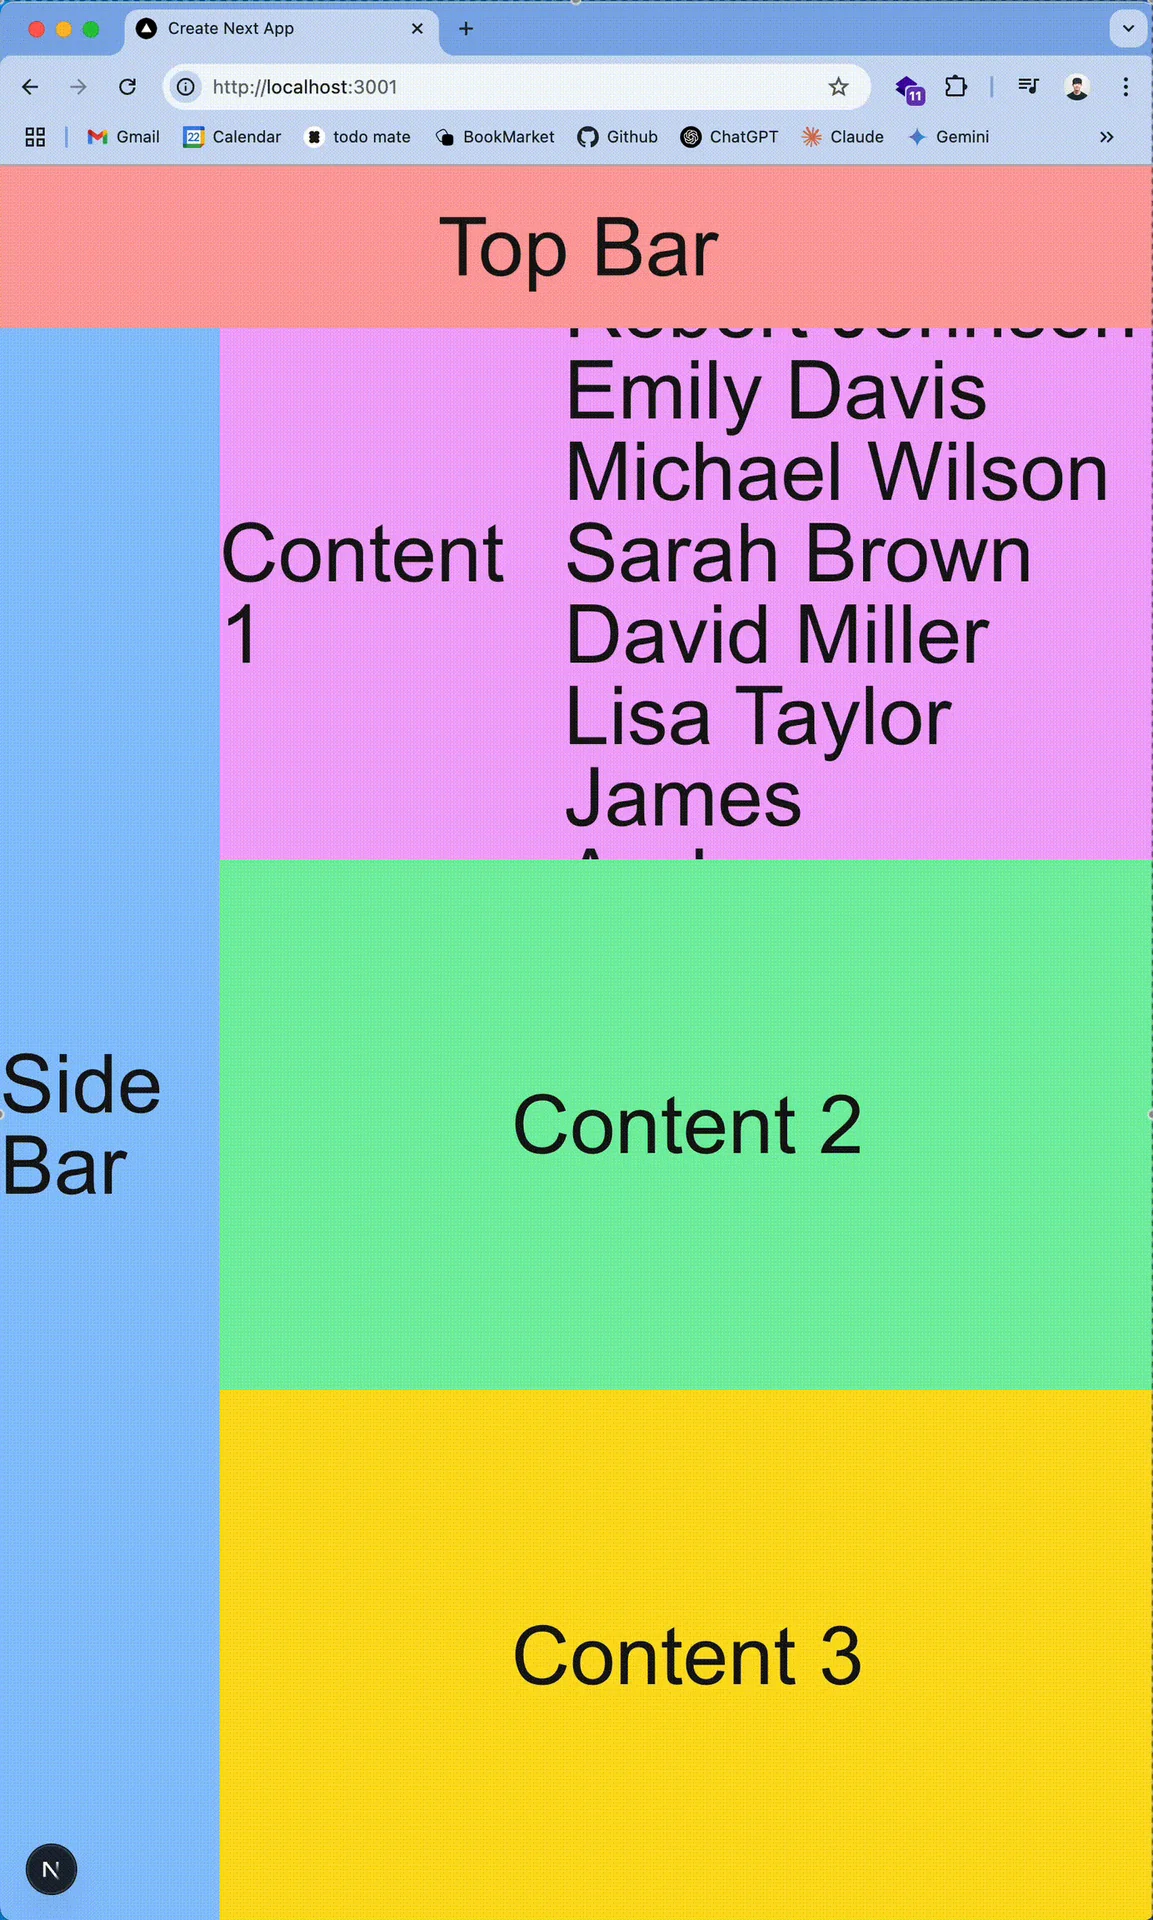
In this situation, even though Main Content 1 is the only component that actually needs real data, other components such as Top Bar, Sidebar, Main Content 2, and Main Content 3 also end up being unnecessarily hidden behind the Fallback.
It is not desirable to degrade the user experience by hiding information that could otherwise be shown, just to benefit from Server Data Fetch. If possible, it is better to immediately show users the information that can be shown in advance.
At this point, many people naturally think as follows.
“Since Main Content 1 is a Client Component, I guess there’s no choice but to do Client Data Fetch.”
Of course, this method can also be one solution.
But is this really the only way?
If we could create a new Server Component, wouldn’t a better approach be possible?
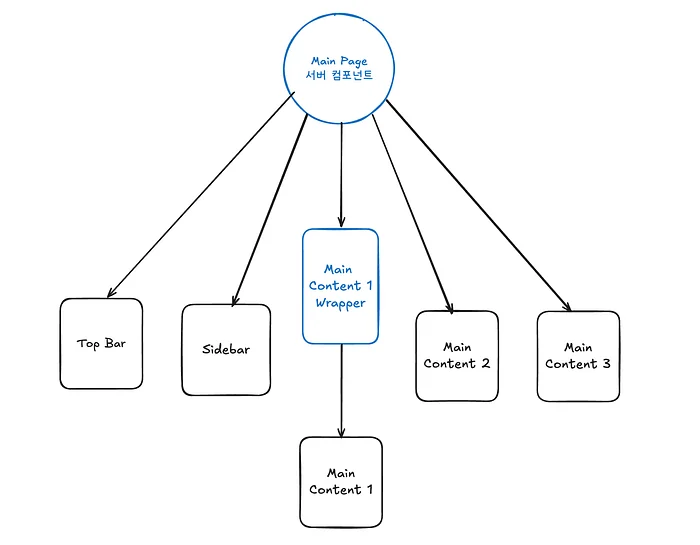
You can use the following method.
export default async function Home() {
  return (
    <div className={cn('h-screen w-screen bg-white flex flex-col')}>
      <TopBar />
      <div className={cn('flex-1 w-full flex')}>
        <SideBar />
        <div className={cn('flex flex-col w-full')}>
          <Suspense fallback={<div>Loading...</div>}>
            <ContentOneWrapper />
          </Suspense>
          <ContentTwo />
          <ContentThree />
        </div>
      </div>
    </div>
  )
}
export const ContentOneWrapper = async () => {
const data = await getData();
return <ContentOne data={data}/>
}By doing this, you can add a new Suspense Boundary outside Main Content 1 and narrow the suspended scope,
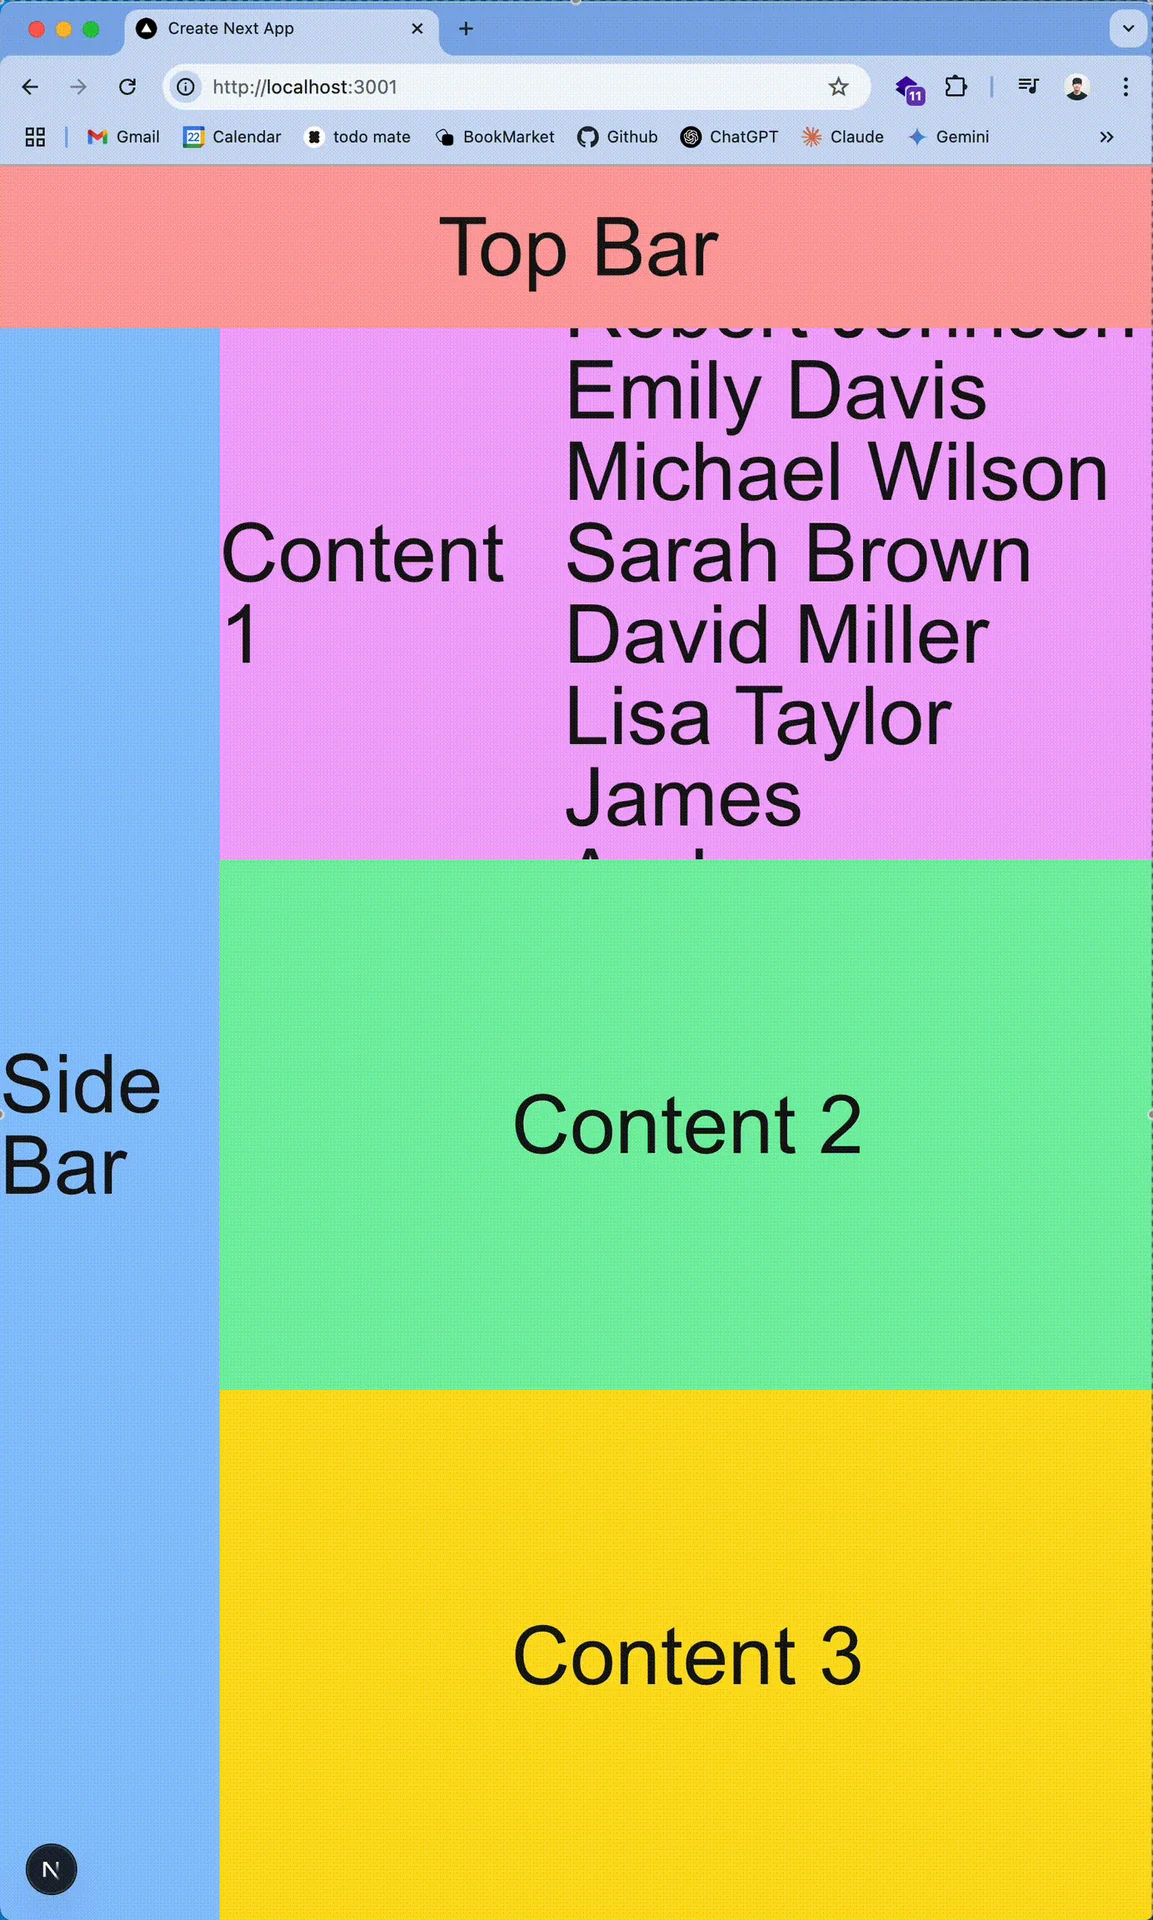
As shown in the image, only the Main Content 1 component that needs data displays a Loading State, while components that can be shown immediately are displayed to the user right away. This greatly improves the user experience.
However, in real development, plans often change or new features get added.
For example, let’s assume a situation arises where the Top Bar component also needs to receive the same data.
In this case, the fastest and most intuitive method is as follows.
export default async function Home() {
  return (
    <div className={cn('h-screen w-screen bg-white flex flex-col')}>
      <Suspense fallback={<div>Loading...</div>}>
        <TopBarWrapper />
      </Suspense>
      <div className={cn('flex-1 w-full flex')}>
        <SideBar />
        <div className={cn('flex flex-col w-full')}>
          <Suspense fallback={<div>Loading...</div>}>
            <ContentOneWrapper />
          </Suspense>
          <ContentTwo />
          <ContentThree />
        </div>
      </div>
    </div>
  )
}
export const TopBarWrapper = async () => {
const data = await getData();
return <TopBar data={data}/>
}However, this approach is not appropriate.
Now imagine that Sidebar and Main Content 2 also need to use the same data.
Going even further, what if there are 100 components on the page, and 99 of them need the same data?
In such situations, creating a Wrapper component for each component and passing data through it is inefficient and makes maintenance difficult.
In particular, since all Wrapper components end up repeating similar logic, managing the code becomes difficult.
Isn’t there a better approach?
To summarize the requirements once again,
With this in mind, to minimize code duplication, it would be appropriate to perform Data Fetch on the Main Page and pass the received data to each component as props.
However, this approach had the drawback that even components that do not need the data were unnecessarily blocked.
We aim to solve this problem by leveraging the Payload of React Server Components and React’s use hook.
The React Server Components Payload explained at the beginning of this article includes values like the following.
One notable fact here is that these props can also include Promises.
Expressed in code, it looks like this.
export default async function Home() {
  const dataPromise = getData();

  return (
    <div className={cn('h-screen w-screen bg-white flex flex-col')}>
      <Suspense fallback={<div className='w-full h-[120px] bg-red-300 flex items-center justify-center text-6xl'>Loading...</div>}>
        <TopBarWrapper />
      </Suspense>
      <div className={cn('flex-1 w-full flex')}>
        <SideBar />
        <div className={cn('flex flex-col w-full')}>
          <Suspense fallback={<div className='w-full flex-1 bg-fuchsia-300 flex items-center justify-center text-6xl overflow-hidden'>Loading...</div>}>
            <ContentOneWrapper />
          </Suspense>
          <ContentTwo />
          <Suspense fallback={<div className='w-full flex-1 bg-yellow-300 flex items-center justify-center text-6xl'>Loading...</div>}>
            <ContentThree dataPromise={dataPromise}/>
          </Suspense>
        </div>
      </div>
    </div>
  )
}
In other words, as in the code above, you can pass the Promise returned by getData() directly to a client component without awaiting it.
Then, inside the Client Component, by using React use
export default function ContentThree({ dataPromise }: { dataPromise: Promise<Data[]> }) {
  const data = use(dataPromise);

  return (
    <div className={cn('w-full flex-1 bg-yellow-300 flex items-center justify-center text-6xl')}>
      Content 3
      <div className='flex flex-col'>
        {data.map((item) => (
          <div key={item.id}>{item.name}</div>
        ))}
      </div>
    </div>
  )
}
This allows us to access the value contained in the passed Promise.
In this way, without creating the existing inconvenient and repetitive Wrapper components,
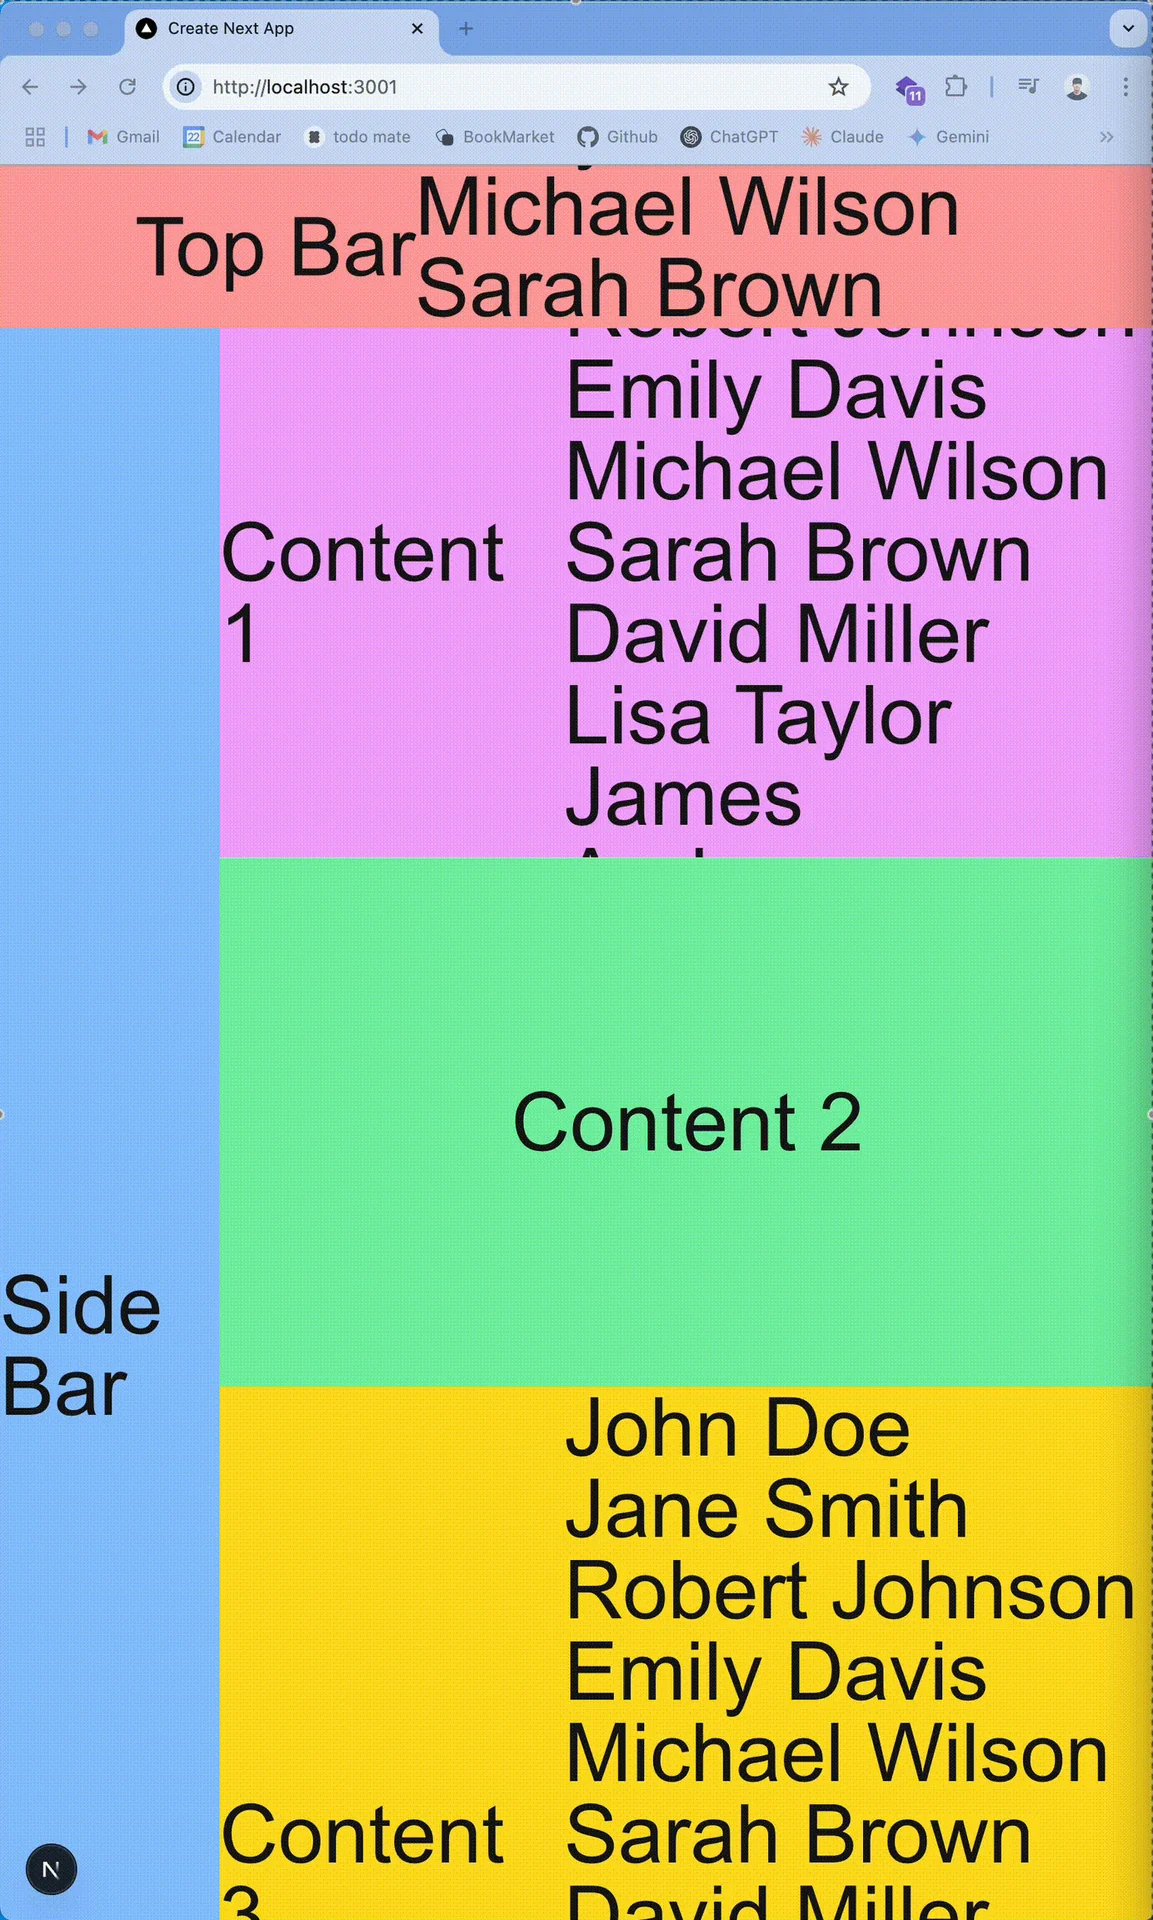
although we fetch data on the Main Page, we can ensure that only the Client Components that need the data are suspended.
Then let's refactor the existing code as well and remove unnecessary Wrapper components.
export default async function Home() {
  const dataPromise = getData();

  return (
    <div className={cn('h-screen w-screen bg-white flex flex-col')}>
      <Suspense fallback={<div className='w-full h-[120px] bg-red-300 flex items-center justify-center text-6xl'>Loading...</div>}>
        <TopBar dataPromise={dataPromise}/>
      </Suspense>
      <div className={cn('flex-1 w-full flex')}>
        <SideBar />
        <div className={cn('flex flex-col w-full')}>
          <Suspense fallback={<div className='w-full flex-1 bg-fuchsia-300 flex items-center justify-center text-6xl overflow-hidden'>Loading...</div>}>
            <ContentOne dataPromise={dataPromise}/>
          </Suspense>
          <ContentTwo />
          <Suspense fallback={<div className='w-full flex-1 bg-yellow-300 flex items-center justify-center text-6xl'>Loading...</div>}>
            <ContentThree dataPromise={dataPromise}/>
          </Suspense>
        </div>
      </div>
    </div>
  )
}
Now, in the Server Component, we can use a highly practical pattern where we only create the Promise, and then only in the Client Components that need the data, we retrieve it through React's use hook.
Deep Dive: How is a Promise passed along?
After seeing the pattern explained above, it may be difficult to clearly understand how it is possible to send an unresolved Promise from the server to the client, and whether data fetching runs on the server, the client, or across both.
To give the conclusion first, the actual Promise is managed on the server.
Then a question may arise: how does the client receive the value of that Promise, and how does it wait until the Promise is resolved?
The payload of React Server Components is sent to the client in a JSON-converted string (Stringify) form.
In other words, the payload of React Server Components goes through a JSON serialization process, and during that process, if the value being serialized is a Promise (or Thenable), instead of inserting that Promise as-is, a new ID is issued and assigned to the Promise before JSON serialization is performed.
To make this easier to understand, let's walk through the process in code. All of the code can be found in React's official GitHub.
1. Discovering a pending Promise during JSON serialization
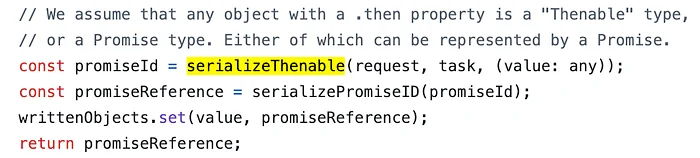
This code is part of the JSON serialization code, and when a Thenable is found during JSON serialization, it receives the ID value of that Thenable through the serializeThenable function.
The logic of the serializeThenable function is complex, but it is enough to understand that depending on the state of the Promise (fulfilled, rejected, pending), it executes additional logic and ultimately always returns the ID value of that Promise.
https://github.com/facebook/react/blob/main/packages/react-server/src/ReactFlightServer.js#L674

Then, using that promiseId value, it calls the serializePromiseID function, which adds the '$@' prefix so that the client side parsing the JSON can recognize that the ID represents a Promise.
If we actually look at the project we saw above,
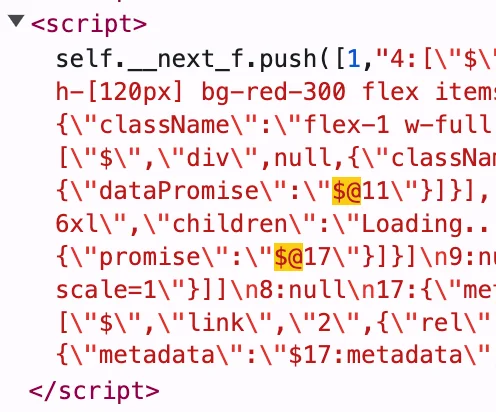
we can see that it received a payload like {"dataPromise":"$@11"}.
Then, based on this information, the client can understand that for the current prop called dataPromise, a promise currently in a pending state with ID 11 will be passed.
2. On the client, create a pending chunk that matches the ID of the passed Promise
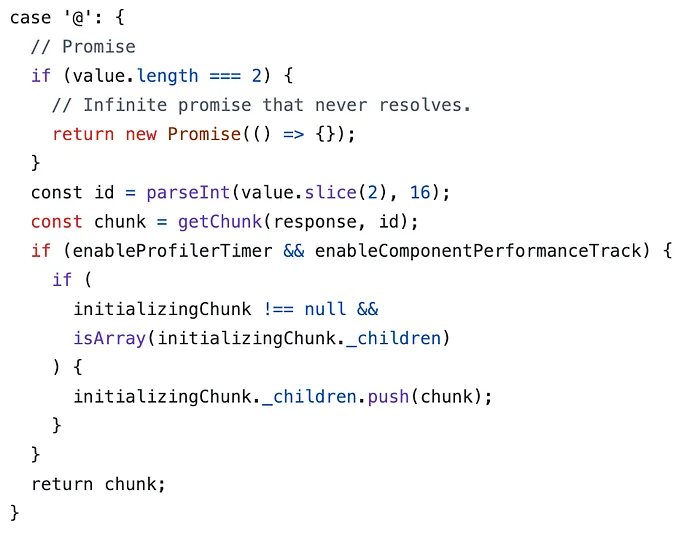
When the client encounters '$@' while parsing the Payload, it recognizes that this value is the ID of a Promise and creates a new Pending chunk with that ID.

This Pending Chunk is internally equivalent to creating a Promise in the Pending state, and React use waits for this Promise.
In reality, it is not a Promise but a new object called ReactPromise, which wraps the received chunk and redefines the Promise prototype, but for ease of understanding, it has been described as a Promise.
https://github.com/facebook/react/blob/main/packages/react-client/src/ReactFlightClient.js#L233
3. The Promise resolves and retrieves the desired data
When the actual Promise managed by the BFF is resolved and the data we want is ready, that data is sent to the client together with the ID value of the existing Promise.
This data is also delivered to the client through streaming, and its format is likewise .
If you inspect the elements in the actual project above,
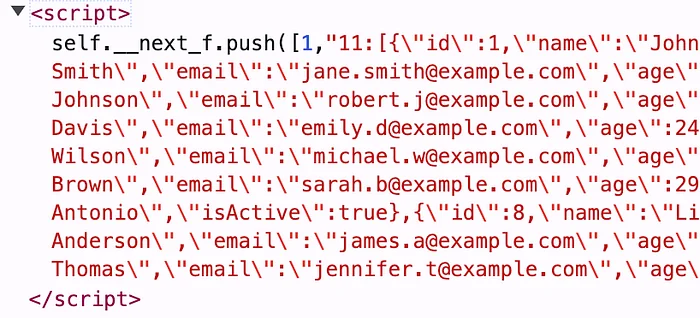
you can find data like this,
and if we analyze the data .push([1, "11:[{\"id\":1,...}"] a bit,
[1, …] means that the currently received data is a React Server Components Payload, and "11:[{\"id\":1,...}" means that the data for the Promise with ID 11 is ….
Then let’s take a look at how the actual code understands this data and how it continues rendering the component that had previously been suspended.
4. From parsing the Payload on the client to rendering the component
To parse the received Payload and continue rendering the suspended component, it first finds the previously created pending chunk through the resolveModel function below, and then calls the resolveModelChunk function.
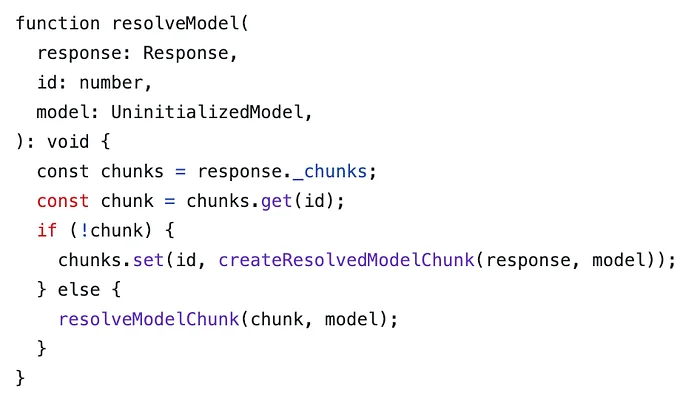
When the resolveModelChunk function is called with the existing pending chunk and the data,
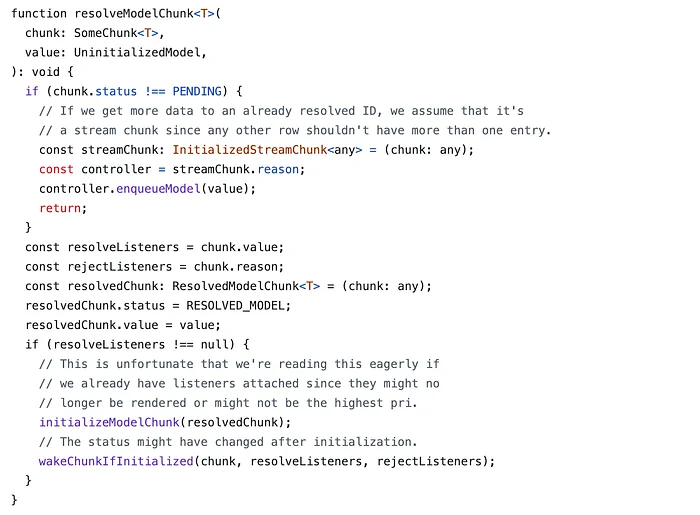
through the initializeModelChunk function, the received data is added to the existing Promise in the Pending state,
and through the wakeChunkIfInitialized function, the component that had been waiting for the Promise in the Pending state is “woken up,” and rendering resumes.
Through this process, React enables the client to recognize the state and result of the relevant Promise and render appropriately using unique IDs and streamed data, even without directly passing the server-managed Promise to the client.
In this article, we looked at various Data Fetch patterns and new patterns that take advantage of React Server Components.
Thank you for reading this long article!